Quantcast
Channel: Libretro
Viewing all 293 articles
Browse latest View live

Getting Started with RetroArch

$
0
0

In the past month I have seen a few guides about configuring RetroArch, while good some fail to explain some concepts, so I thought why not, I’ll make a series of blog posts about configuring RetroArch, starting from the basics.

Terms

  • Core — a core is a program that runs in RetroArch (or another libretro frontend)
  • Frontend — a frontend in this context is a program that can run libretro cores (RetroArch, Minir, Kodi’s Retroplayer are examples of this)
  • Content — content is a game/program that is run by a core, some cores also require no content
  • Retropad — retropad is RetroArch’s input abstraction controller, it’s the interface between the physical controller and the core inputs
  • Save Files — save files are saves that are made from within a game, usually cross platform and should work across emulators in most cases
  • Save States — save states are snapshots of the content menory at a particular moment, these are not always cross platform and most certainly won’t work on a different emulator that the one used to create them
  • System Files — additional files that might or not be part of the romset that might be needed to get some content to work (usually referred to by the BIOS term)
  • Autoconf Profile — a configuration file that has button definitions for a particular gamepad

Downloading RetroArch

First thing is to download RetroArch. People usually prefer stable releases. We are close to releasing a new stable but things have changed a lot since 1.2.2 so I would strongly recommend to get a nightly build.

Windows/OSX users should browse to our buildbot and go into the nightlies folder.
For Windows users we have a full package:


Windows users will need to have the DirectX redistributable installed, that is available here.

OSX users should grab the latest dated package, there are usually two downloads, the one with the CG prefix requires the NVIDIA CG toolkit available here.

Linux users usually have to build their own binaries. For Ubuntu users there is a PPA (ppa:libretro/testing).
The process is as follows:

sudo add-apt-repository ppa:libretro/testing
sudo apt-get update
sudo apt-get install retroarch

For mobile users there are two options: install builds manually or use f-droid/cydia to install always up-to-date packages.

The URL for the cydia repository is: http://buildbot.libretro.com/repo/cydia
The URL for the f-droid repository is: http://buildbot.libretro.com/repo/fdroid/repo

For consoles, just grab the bundle and extract to the usual locations, I’ll try to cover specifics on consoles on another post later on.
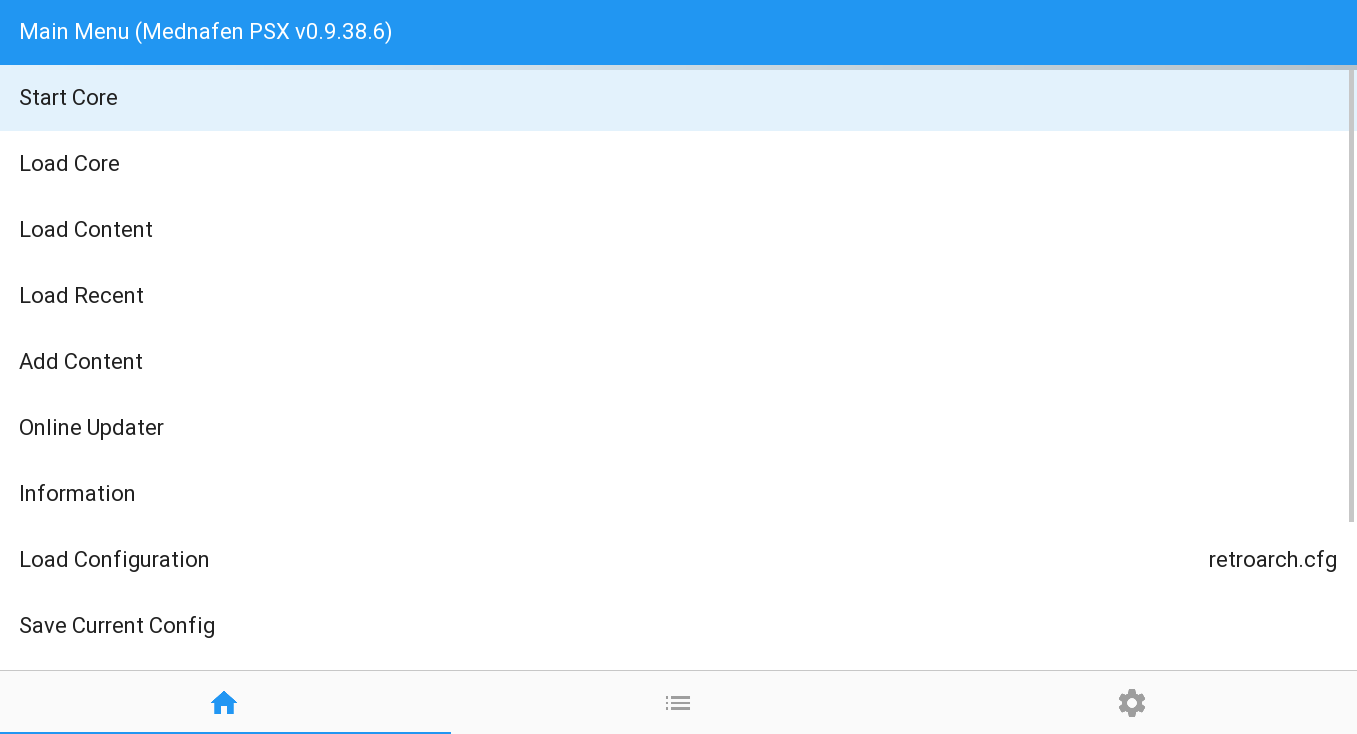
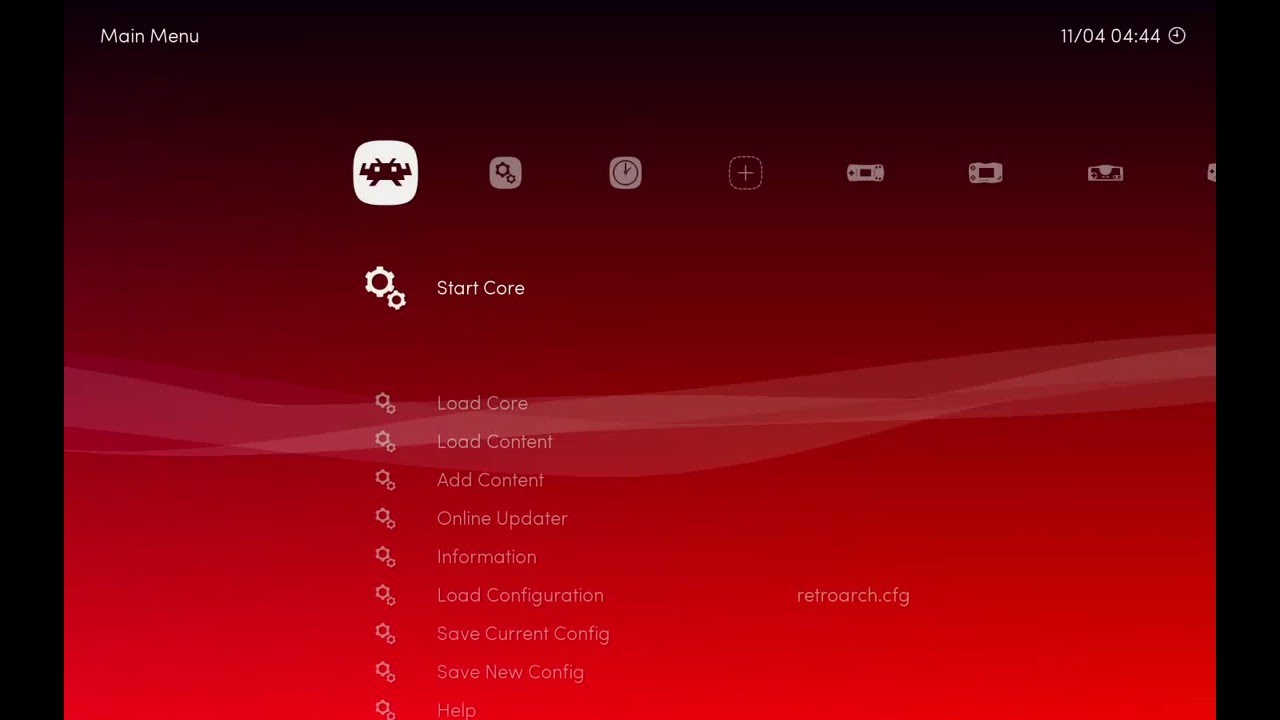
First Run

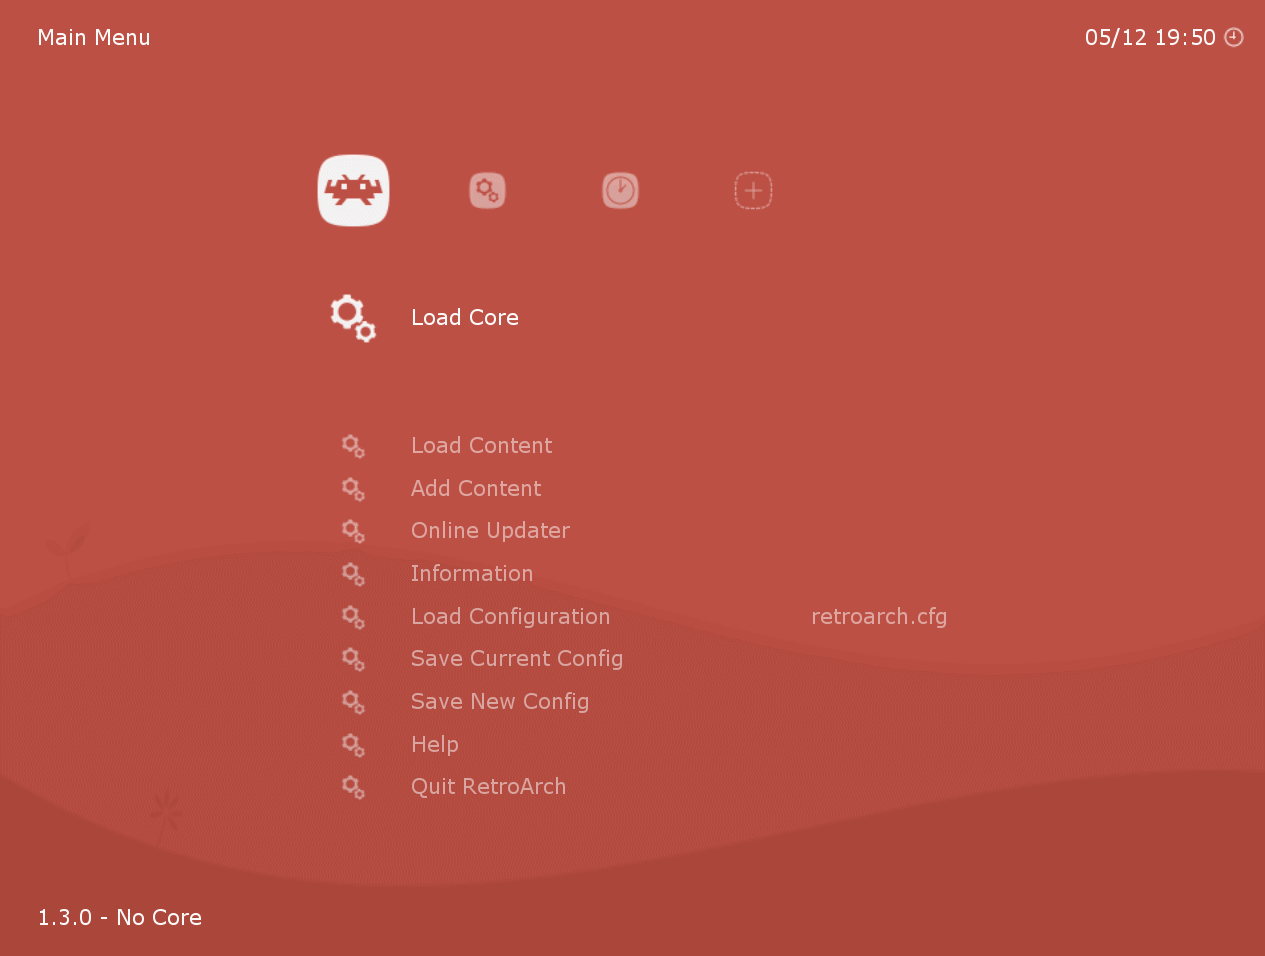
Windows/Mac/Linux users will be greeted by this screen:

This is one of three menu drivers that are ready for general usage, it’s called XMB and it’s designed to be navigated with a controller.
There is also GLUI/Material:

And RGUI (this is the only available driver on many consoles):

No matter the driver, all of them can be navigated with a gamepad and they share most of their functionality.

Navigating the GUI

RetroArch has an autoconf mechanism with several autoconf profiles preinstalled. Users with pads not supported out of the box will need to map controllers, either with a keyboard or via an on-screen overlay:
For keyboard users, these are the default bindings:

Buttons:
==>
==>
==>
==>
==>
==>
==>
==>

Navigation:
==>
==>
==>
==>

In the menu, is used to accept/select and is used for back/cancel, is used to scroll up and is used to scroll down quickly.

is used to search the current list and is context aware, currently mostly used to trigger a content scan.

is used to reset a setting to default and is used to get information on the current entry if available.

Finally, remember that closes the program. The in-game menu can be toggled with F1.
The rest of the default keyboard bindings can be checkd in Settings/Input/Input Hotkey Binds

The arrows/d-pad should be self explanatory.

Basic Controller Configuration

Users with XINPUT controllers can skip this section, there are a few others that have profiles too depending on the platform. If the controller is auto configured yellow text will indicate that at startup/connection, like this:

If an unsupported gamepad is connected it will be indicated too, like this:

If the controller isn’t automatically configured it’ll have to be mapped. The controller should be mapped with RetroPad in mind, not with the emulated console. Later on I’ll explain how to re-wire the RetroPad to core bindings.
The RetroPad looks like this:

With that in mind let’s bind the buttons:

  • Go to settings (the gear icon to the right)
  • Go to input
  • Select User 1 Bind All
  • Press the buttons as the program asks for them

Sometimes some buttons may register too fast, for example the analogs in my NES30 Pro are too sensitive so usually it ends up skipping one or too. In that case might navigate down and check the bindings and fix anything that was bound incorrectly.
The process should be repeated for all the controllers in the desired ports and that’s all there’s to it! (I’ll revisit input later on for controller autoplug, adding labels to buttons, setting hotkeys, etc.).

Configuring Directories

The second most important aspect in my opinion is to configure paths correctly. In most platforms we have default paths set for most stuff, following should be considered:

  • System File Directory, Save File Directory, Save State Directory, are set by default to the directory from were content is being loaded
  • The paths mentioned above need write permissions
  • File Browser Directory is the location from were the content browser will start, some cores that don’t use the correct interfaces may need to write to the content directory, an example of this behavior is the DOSBox core
  • Cache dir is a location for stuff that might be cleaned up after exit, it caches achievement data and extracted roms might be stored there until they are unloaded

Go into Settings/Directory and make sure to set the directories to best suit your environment.

Online Updater

The next step is to get some software running on RetroArch, for this purpose we need cores, and content. Cores can be downloaded using the Online Updater service, and we even have a few public domain games for the game&watch core.
To download cores select Online Updater and then Core Updater, wait a few seconds and the list will be populated with the cores available for the platform in use.

In this example I downloaded 2048 (requires no content), prboom and the game & watch core (content is already available for this game on our downloader)
Update the rest of the entries too, they may contain new shaders, overlays and even autoconf profiles.

Loading, Adding & Scanning Content

After downloading cores it’s time to load a game, to do so select Load Content/Select File And Detect Core. The other options allow loading content too but are more advanced and will be discussed on another article.
In this example I have already set my content dir and I downloaded a SNES core, I’ll be using a public domain rom for demonstration purposes:

Content can be downloaded from our online repository too, it’s a bit bare at the moment but we intend to add some public domain roms, shareware games and demos and open source games that are supported in our cores. To do so select Add Content / Download Content

Note: Doom isn’t actually available there yet, it was done just to illustrate the process, the same process applies for G&W content available now

Finally, users that already have content may want to scan it against known databases, after doing so these games will be easily avialable as systems under the XMB menu.
First of all, update databases under Online Updater, then to initiate a scan go to the plus icon in XMB or go to Add Content/Scan Directory or Add Content/Scan File, after that matched content will be directly available from the system list.

And that’s it! We’re done with the basics, I’ll try to write an in-depth article on some important subsystems later but this should be enough to get started.


RetroArch 1.3 released

$
0
0

RetroArch 1.3 was just released for iOS, OSX, Windows, Linux, Android, Wii, Gamecube, PS3, PSP, PlayStation Vita and 3DS.

You can get them from this page:

http://buildbot.libretro.com/stable/1.3.0/

Once again the changelist is huge but we will run down some of the more important things we should mention:

Cores

Reicast (Dreamcast core)

RetroArch-1219-085722 RetroArch-1225-080518 RetroArch-1215-190216RetroArch-1215-193138

We have ported Reicast over to the libretro API. This is a Sega Dreamcast emulator.

Supported platforms:

Right now, it runs on OSX, Windows, and Linux (64bit Intel only for now). Over the next coming days/weeks we will be porting it to Android and iOS as well and making it work for 32bit Intel too, so keep watching this space.

There were some improvements made over regular Reicast. Render To Texture features are enabled (they are disabled by default in Reicast), which means that certain effects like the heat room in Resident Evil: Code Veronica and the pause screen in Crazy Taxi render correctly. A bug got fixed which led to a bunch of sprite tile glitches in Capcom Vs SNK 2. We added a workaround so that Marvel Vs Capcom 2 no longer crashes (by  detecting the game and changing it on the fly to rec_cpp). We made the x64 dynarec work on OSX which wasn’t working before. We implemented a workaround for Soul Calibur (whitelisted for OSX/Linux only for now) that should prevent some of the Z-fighting.

Notes

1 – Reicast NEEDS BIOS files. You can run it without BIOS files but the success rate is so low that we really stress you always use it with bios files. The BIOS files go inside <system directory>/dc. If you have not set up a system directory, then it will look for a folder called ‘dc’ inside the same directory you loaded the ISO from.

2 – Make sure that ‘Shared Context Enable’ is enabled in RetroArch. To verify this, go to Settings -> Core -> HW Shared Context Enable and make sure it says ‘ON’. If you don’t do this, you might find that there are severe graphical glitches or that nothing even shows up at all.

3 – It should be stressed that the 64-bit dynarec for x86_64 is a lot slower than Reicast’s 32bit dynarec. Right now, the Reicast libretro core on PC is only available in 64bit form. When the 32bit version comes out, you might want to try it on a 32bit version of RetroArch too, it might give you a big speedup vs. the current 64bit version.

I fully intend on doing more work on Reicast once we have these releases out of the way.

Platforms:

You will find installation instructions for the platforms here

MacOSX PowerPC (10.5) (NEW)

Starting with version 1.3, RetroArch is now available on PowerPC Macs running OSX.

You need at least MacOSX 10.5 (Leopard) to be able to run the PowerPC version of RetroArch OSX.

I have included the cores which are known to work so far with the RetroArch bundle itself since we don’t yet have OSX PowerPC cores on our buildbot.

PlayStation Vita/PlayStation TV version (NEW)

There is also a RetroArch version available now for PlayStation Vita and PlayStation TV. To use this, you need to use the (still quite impractical for daily usage) Rejuvenate jailbreak. No better jailbreaks are available as of this time, sorry. We will continue fleshing out this port for when a more mainstream jailbreak comes around.

Nintendo 3DS version (NEW)

The Nintendo 3DS version is in a satisfactory enough state to be released now. It has received quite some attention on the Internet already. For instance, some of our cores (like dosbox libretro) has received quite some attention in the press. Others have been impressed by PCSX ReARMed being able to run on 3DS. Overall, the 3DS version has made quite the splash.

You will get the best experience using a New Nintendo 3DS since it has a much faster CPU than the regular 3DS. All of the cores available for 3DS will benefit from this bump in specs.

Lakka – the RetroArch turnkey solution for HTPCs/ARM devboards (NEW)

lakka

Remember all that talk about RetroBox last year? RetroBox has now turned into Lakka.

With Lakka, you can turn nearly any ARM or x86 hardware into a fully-functioning retro videogame console capable of running countless games with a very nice userfriendly console user interface. We strive to make it as plug-and-play as possible so that you are not reminded at any point in time that this is actually a PC running Linux.

Startup time is very quick (less than 5 seconds is a conservative figure), and in most cases we use DRM/KMS graphics drivers to ensure the best possible latency given the hardware. The entire user interface is gamepad controlled, you don’t have to bring a keyboard and mouse to this thing, it should be as plug-and-play as possible.

Please check out our sister project’s website here: lakka.tv. It’s quite overwhelming the amount of ARM hardware and HTPCs that Lakka can run on.

This is our antidote and answer to the kind of ripoff RetroArch Android boxes that have begun to pop up like Retro Freak and Retron5. The only thing we lack yet obviously compared to those is reading from the original cartridges (inso far as that is important), but we encourage developers to contribute to the project so we can build it up to have support for that too. In the end having something that you can get free of charge and bring your own hardware to it is in your own best interests vs. these kinds of retro hustles.

For the more technical minded, I can’t stress this enough: you are getting an inferior experience emulating on some underpowered Android SoC the likes of which are in these el-cheapo devices that are nevertheless sold at huge markups, you’d very much want to bring your own hardware and run Lakka on it for the best experience and also so that you aren’t held hostage by the hardware itself with forced firmware updates crippling what you can do with the hardware. In most cases we use DRM/KMS drivers with Lakka, so you don’t get the overhead of an X11 server to begin with. What little we lack in terms of spit and polish we hope we can fix with some collaborative effort.

MacOS X (10.6/10.7/10.8+)

RetroArch is available for both 32bit and 64bit Macs running OSX.

iOS

RetroArch is available on iOS, both on iPhones and iPads. You can use the Cydia version if you are on a jailbroken device, otherwise you will have to sideload it yourself on your non-jailbroken device.

Android

The user interface got a total overhaul (see ‘Revamped User interface’). Numerous bugs were fixed.

I removed the camera and location API permissions, these were experimental augmented reality features which in hindsight were not really worth it to have to release several different APKs for and it was preventing us from being able to appear on Android TV. It was only ever used in one test core which wasn’t even available through the buildbot anyway so it was just a big inconvenience in the long run.

I know the v1.2 release did not go over well with Android users and there was a lot of criticism. I hope that with v1.3 we are able to win some of these users back. Needless to say it has been hard making RetroArch less CLI-focused but I think it’s finally starting to bear fruit.

You can get the Android version either from the Google Play Store or (better yet), through F-Droid. F-Droid is a really convenient way of being able to run RetroArch. As soon as we push an update to the code, F-Droid within no time will inform you an update is available and allow you to upgrade to the latest version. This makes it possible for you to update RetroArch daily without having to wait for a while for some stable version to come out.

PlayStation3 (PS3)

The PS3 version features some big changes. MaterialUI and XMB are both available now as menu drivers. The XMB menu driver is now enabled by default. Libretro database support is in, and things should generally work fine.

I released only the DEX version. PS3 sceners can take the DEX release and create a CEX version of it.

Wii version

Wii and Gamecube ports are the same as ever. More work is needed on the USB HID part of RetroArch Wii before we can reliably use the DualShock3/4 and other USB pads.

PSP version

The PSP version has been updated. There are no big changes to mention for this port.

RetroArch Improvements

Improved playlist support

Both PlayStation1 and PSP games can now be scanned. Once the games are scanned and identified inside the database, they are added to a system-specific playlist. This makes it easy and convenient for you to start these games by just going to the playlist and selecting them instead of having to go through the filesystem and manually select the file again.

Revamped user interface 

There was a ton of criticism about version 1.2’s user interface on mobile devices, like Android. We have decided to give it a makeover. It now resembles a Material Design user interface and some of the annoying display bugs were fixed on Android. It now also has tabs at the bottom which you can touch. This can quickly take you to the playlists and/or settings screen.

XMB has also received a makeover. A bunch of actions now have their own tabs inside the horizontal menu. For instance, you can now scan for content by going to the ‘Add’ tab and selecting a directory instead of having to navigate through a bunch of menus. The history list is also now on a separate tab, as is the settings themselves.

RetroArch/libretro’s reach

We don’t like to brag a lot and we don’t like self posturing. Nevertheless, RetroArch and libretro is definitely starting to become omnipresent. Plenty of people have used it in some form or another without even being aware of its name or its existence. For instance, there have been plenty of projects unrelated to us or the team (like NewRetroArcade) which were actually just libretro frontends implementing the libretro API, and the popular Raspberry Pi distribution RetroPie for instance uses RetroArch for a lot of the videogame emulation it provides.

Not everything has gone according to plan. We had to do a very substantial rewrite this past year that has definitely been daunting and some of you noticed that things didn’t progress as fast as we’d like but we are finally out of development hell again and ready to fire on all cylinders again. There will never again be another half a year delay in development due to endless rewrites.

What’s next for RetroArch

RetroArch 1.4 (the next version) will bring RetroArch to two new platforms.

New platforms – tvOS/Windows Phone

There will be a tvOS port, and there will be a Windows Runtime (WinRT) port so that RetroArch can run on Windows Phones among other things. Those are the two big porting endeavors I will be busy with. I hope to get something substantial done by end of February/March, but don’t hold me to that.

There will be a new user interface as well added to the mix that will cater more to people used to point and click-based interfaces. We showed some screenshots before of the ‘Zarch’ interface we have been working on, and there is also a ‘Hexa’ user interface which might make it out of the prototype stages as well.

There will also be a lot of new cores. In fact, cores are being updated and added daily through the cor e updater, so definitely keep watching that space. You don’t have to wait for version 1.4 in order to be able to use these new cores.

F-Droid changes

$
0
0

We changed the signature used to sign our nightly builds to match the signature used on the Google Play version so you may need to uninstall and reinstall in order to get updated.
In most cases it should be possible to backup the configuration, it should be located in /storage/emulated/0/Android/data/com.retroarch/files/retroarch.cfg, reinstall, run RetroArch once and copy it over to the same location.

It’s an inconvenience but it had to be done at some point.

Day 1 Vulkan support

$
0
0

Vulkan_API_logo.svg

Today Hans-Kristian Arntzen (also known as Themaister) sent us a big pull request giving RetroArch complete Vulkan support, the new graphics library API that has been unveiled and released to the public today.

See the pull request here.

Features/what has been ported

  • A full-featured graphics driver for Vulkan was written.
  • It should be compatible with MaterialUI/XMB and the other hardware-accelerated menu drivers that were previously GL-only.
  • Overlays should work through Vulkan. (by overlays we mean the gamepad overlays in RetroArch)
  • Font rendering should work through Vulkan.
  • Shader support. Vulkan support will mean some changes for shaders that will be unveiled later on.
  • Asynchronous GPU recording.
  • Libretro cores can be written against Vulkan as well. A test core was included for this in the repo, you can find it here.

Libretro cores that use Vulkan will require an additional header, libretro_vulkan.h.

Compilation instructions

If you want to play with this with the current drivers out today, here is a short tutorial. It assumes you are running Linux, you have a Vulkan-compatible driver installed for your graphics card, and it assumes you are running a Wayland window manager. It has been successfully tested on ARM Mali GPUs and Intel HD GPUs so far.

1 – First make sure you have the necessary Vulkan headers and libraries installed for your graphics card.

2 – We are assuming you are running Linux and you have Wayland setup. DRM/KMS and GLX support will come later.

3 – Download the latest source from RetroArch (the github repository can be found here), preferably by cloning the repository with your git client.

4 – Download all the necessary submodules by doing:

git submodule init

git submodule update

This will fetch glslang which you will need in order to compile the Vulkan bits.

5 – When inside the retroarch directory, run ‘configure’.

If Vulkan was detected, you should see the following line:

‘Checking function vkCreateInstance in -lvulkan … yes”

6 – Now run make in order to compile.

7 – Once compilation is done, try running the RetroArch executable. You might have to change the video driver directly in your retroarch.cfg file by searching for the line :

video_driver =

and changing it to :

video_driver = “vulkan”

8 – Start up the RetroArch executable you just compiled. Assuming you are running in Wayland and assuming your Vulkan driver is working, you should now be greeted by the menu.

Some additional instructions for Intel Mesa Vulkan users

We use Mesa’s vulkan branch for testing RetroArch with Vulkan on Intel HD GPUs. The Intel driver’s support for Ivy Bridge and Haswell is currently marked as ‘experimental’, so expect bugs with it until they improve the driver. Broadwell and Skylake should be stable.

Note – you might have to compile the driver specifically with Wayland support enabled – this is not guaranteed to be enabled by default (in fact, it seems to default to X11 support if you don’t specify anything).

To recompile it with Wayland support, run this command while inside the source directory –

./configure –with-gallium-drivers= –with-egl-platforms=wayland,x11 –with-dri-drivers=i965

After that, run make again to recompile the drivers. After it has finished, copy libvulkan.so and the symlink files to your system library directory.

EDIT: So far we have been able to reproduce the following issues while testing RetroArch with the Vulkan backend on Ivy Bridge and Haswell (the GPUs that currently are not fully supported by the driver and are marked as ‘experimental’) :

Ivy Bridge – crashes at an assertion :

anv_nir_lower_push_constants.c:47: lower_push_constants_block: Assertion ‘state->is_scalar’ failed.

Haswell – gets ingame but shows a black screen instead of the menu. However, by navigating blindly to select a game – or by directly launching a game from the commandline – it will still output graphics.

We will have to wait for further driver improvements for now before it’s possible to run RetroArch with Vulkan on these slightly older GPUs.

Compiling a Vulkan core

In case you have RetroArch setup with Vulkan, you can play any of the non-libretro GL based cores. But what about a libretro core that is specifically made for Vulkan?  That can be done as well.

Themaister has made a Vulkan test core as a proof of concept. You can view the source here.

Follow these steps in order to compile it and test it on your device:

1 – Go to the retroarch source directory, go to cores/libretro-test-vulkan

2 – Run make inside the directory.

3 – If everything went well, it should create a file called ‘testvulkan_libretro.so’. Move this file to the directory containing all your other libretro cores.

4 – Start up RetroArch, go to Load Core. Select the Vulkan test core. Select ‘Start Core’.

Vulkan progress report and initial impressions

$
0
0

Vulkan_API_logo.svg

So it’s already a couple of days ago since Vulkan launched. We were one of the first non-test programs in the world to launch on Day One with a quite mature Vulkan implementation. So far it seems only ARM Mali, nVidia and Intel Broadwell Mesa drivers can handle all the features inside RetroArch’s Vulkan backend.

This is a followup to the earlier article which can be found here.

WSI XCB support

Back when RetroArch added Vulkan support on Launch Day, there was only a working Wayland implementation.

We support Vulkan over XCB now too. This means you can get Vulkan to run now on Linux with an nVidia GPU since their binary  blob driver doesn’t support Wayland.

I have tested the XCB context successfully on an Intel Ivy Bridge GPU as well. You need DRI3 support in order for this to work.

In case the Vulkan driver does not work for you on Intel, try creating the file ‘/etc/X11/xorg.conf.d/20-intel.conf. The file can be found here.

We recommend that if you have the option to choose between the two (and on some GPUs you simply might not have this option, like nVidia), that you pick Wayland over XCB and an X11 server. It’s a lot smoother.

Some Intel Ivy Bridge/Haswell snags and how we overcame some of them so far

Font glyph rendering now works correctly even on experimental Vulkan drivers that don't yet support swizzling for some functions.
Font glyph rendering now works correctly even on experimental Vulkan drivers that don’t yet support swizzling for some functions.

Mesa Ivy Bridge/Haswell drivers (you can find them here) are currently very incomplete for Vulkan, so we had to workaround some things in order to make RetroArch run with Vulkan on them.

Ivy Bridge/Haswell drivers currently don’t support push constants, so this commit was necessary in order to get past it.

This made RetroArch go ingame on Ivy Bridge, however, there were still a couple of issues. RGUI doesn’t work and just shows a black screen (it works on Broadwell though), XMB crashes on an assertion (works on Broadwell), and GLUI/MaterialUI showed messed up font glyphs.

The messed up font glyphs required another workaround since it seems Ivy Bridge/Haswell drivers don’t support swizzling yet for vkImageView. So this commit made most of the graphics issues with GLUI/MaterialUI go away.

In case you want to test RetroArch with Vulkan and you don’t know how to set it manually to GLUI/MaterialUI, open up a text editor, find your retroarch config file (usually it’s ~/.config/retroarch/retroarch.cfg”), find the line that says “menu_driver = ” and replace it with:

menu_driver = “glui”

In order to start RetroArch with the Vulkan driver, you can either try to set it to the Vulkan driver through the builtin GUI, or if this is not an option, open retroarch’s config file with a text editor (usually ~/.config/retroarch/retroarch.cfg”), find the line that says ‘video_driver =’ and replace it with:

video_driver = “vulkan”

There are still some remaining issues that are the fault of the driver. For instance, if we go to the ‘Video’ subsection of the Settings menu, you will see some debug lines in the terminal complaining about:

anv_device.c:1016: execbuf2 failed: Invalid argument (VK_ERROR_OUT_OF_DEVICE_MEMORY)

For some reason the few on/off icon labels it needs to draw apparently triggers this. On Broadwell this works fine so we just assume it’s another driver bug to do with experimental Ivy Bridge/Haswell support.

We also get spammed a lot with this warning message inside the menu:

genX_cmd_buffer.c:195 ASSERT: srcStageMask == 0

Other things that are currently broken on Ivy Bridge/Haswell – GPU Recording/Screenshot seems to cause a crash –

anv_cmd_buffer.c: 805: anv_cmd_buffer_emit_binding_table: Assertion ‘surface_state.alloc_size’ failed.

According to Themaister this works fine on Broadwell.

Fortunately, the Vulkan shaders that maister already made do seem to work already on Ivy Bridge/Haswell. Right now there is just a few tiny shaders, two variations on a CRT shader, and they both worked on Ivy Bridge and at fullspeed.

The repo can be found here.

To use these, you’d launch a game with RetroArch, go to the Quick Menu, go to Shader Options, select ‘Load Preset’ and then browse to the directory containing the shader files and select one of them.

Discrete card progress

Themaister today addressed some performance issues on discrete GPUs like Nvidia which don’t really like you doing linear texture uploads, which is actually preferred for integrated GPUs like Intel HD.

Some initial impressions

Screenshot of Ridge Racer running in Mednafen PSX libretro core with the Vulkan crt-lanczos shader applied (running on Ivy Bridge Intel Mesa Vulkan driver).
Screenshot of Ridge Racer running in Beetle/Mednafen PSX libretro core with the Vulkan crt-lanczos shader applied (running on Ivy Bridge Intel Mesa Vulkan driver).

So it’s early days but what are some of the things that stand out so far?

1 – GPU Recording is supposed to be much faster now vs. the PBO readback approach that we had to use with the OpenGL driver. I haven’t been able to test it though since the Ivy Bridge/Haswell driver currently crashes when selecting it. On Broadwell and nVidia I am told  it works though.

2 – When you have ‘logging enabled’ in RetroArch, it will always report frame time deviations at application exit inside the terminal. They are much lower with Vulkan than they ever were in GL. Frame time deviations as low as 0.005% and 0.035% are pretty much expected, with GL you could only dream of such low figures.

Because of these much lower deviations and because of much better control over buffer swap management (see point 3), audio/video sync is just so much nicer. You especially notice it with cores like Beetle/Mednafen PSX when you are running a game that is interlaced, the deinterlacing seems to render a lot smoother and has less ugly ghosting side effects as before.

3 – Vulkan gives you much more control over the swap chain. Because of this, fastforwarding will no longer screen tear like it did with OpenGL. This is actually a very cool improvement. RetroArch allows you to set the maximum fast forwarding runspeed. If you set it to 2x and then run a game that runs internally at a 30fps framerate, you can actually make it run at double the framerate by just fastforwarding it, and unlike with OpenGL, you won’t experience any video tearing. Of course your audio will also be sped up by 2x but hey :).

4 – I can notice on average so far a 3 to 4fps increase when running Vulkan over XCB compared to the OpenGL driver running in X11. To preface this: this is using a software rendered core like Mednafen PSX, as in, the 3 to 4fps speed increase appears to be mainly faster blitting and reduced overhead.

With Vulkan, it is possible to increase performance of our libretro cores even further with software rendered cores. A new environment callback added to the libretro API called RETRO_ENVIRONMENT_GET_CURRENT_SOFTWARE_FRAMEBUFFER allows us to grab a pointer to GPU memory which we can use as a framebuffer for the core. With OpenGL, how video rendering would work with a software rendered core is as follows: the core maintains its own internal framebuffer, it updates this as it pleases, then at the end of a frame it sends the frame to the frontend through the video_refresh_t callback. The libretro frontend would then take this frame, copy it to the GPU through glTexImage2D or glTexSubImage2D, and then render it.

With this new environ callback (and video driver backends that support it like Vulkan), this additional copy can be entirely skipped, leading to a performance increase. I have already implemented this for a few cores like TyrQuake and FCEUmm.

5 – Shader passes are already a thing, and we can already stack shaders like we could with the OpenGL and Direct3D 9 drivers. Shader parameters aren’t implemented yet but something will be worked out.

Obviously this will have some consequences for the common-shaders repository as it currently exists. Obviously we will not at any point just remove the currently existing Cg/GLSL shaders that currently exist, but we might have to make an entirely different repository for Vulkan.

6 – Comparing actual Vulkan cores like the libretro-test-vulkan core to the GL test core serves no purpose so far since the test cores don’t even render the same thing, so I’m not going to be making any comparisons there. In short, there will be advantages for both hardware-accelerated cores and software rendered cores with Vulkan.

What remains to be done?

1 – Waiting on better drivers, obviously. There is only so much stuff that can currently be worked around with the Ivy Bridge/Haswell drivers. Hopefully a lot of these workarounds will in the future no longer be needed.

2 – There are currently some rendering issues with the ‘Zarch ‘menu driver (not that we intend that to be used right now for endusers but still, we need it rendering correctly with Vulkan too anyway for feature parity).

3 – More WSI context support. Win32 still has to be done (don’t have the hardware or the OS on my side, hopefully others can hop in here and help out), Android (I will be able to look at this myself and at least nVidia should have Vulkan drivers ready for use on Shield devices, I suppose), and Mir (we don’t actually support Mir yet on a context driver level, but it might be time to look into that). Native DRM/KMS context driver support is something I personally am really hopeful for.

Making Of: Craft core

$
0
0

qTILoyDWhile porting and rewriting ‘Craft’ for use as a libretro core, we decided it would be nice to document some of the steps involved for the purpose of education.

You can check out our source code repository here.

There might be addendums and followups to this article later on. Note that some of these steps are not things that are ‘required’ to be done for the purpose of porting software to the libretro API, they are simply best practices based on the subject matter at hand.

Step 1 – Getting it compiled
‘Craft’ uses Cmake as its build system. While libretro places no requirements on which build system you use for your project, usually out of habit and preference we prefer to write static Makefiles for convenience and portability instead.

We reuse a basic Makefile template for this that we import into other projects. The three files we will be creating are : Makefile.libretro, link.T, and Makefile.common. We will put these files into the root of the project (or any other place where the central Makefile is usually stored).

To make things easier to understand, Makefile.libretro is the general Makefile solution which includes Makefile.common. Makefile sets up all the platform targets that your core supports, while Makefile.common would be the equivalent of CMakeLists.txt. You define all the files here that will need to be compiled here.

A rundown on some of the variables inside Makefile.common :

SOURCES_C – You add C source code files to this variable.

SOURCES_CXX – You add C++ source code files to this variable.

INCFLAGS – You add include directories to this varaible.

Craft is a C-only program, so we will add all the source files to SOURCES_C.

First we will attempt to compile as many files as possible before we will move on to actually making it work with libretro. Later on, we might replace some of the dependencies that ‘Craft’ uses with some of our own for reasons of portability and consistency. Some dependencies we will avoid for now like glew and glfw, we will add our own substitutes for this later on.

You will notice after following this commit that there are still quite a number of undefined references left before the core will actually be assembled. That is because of some of the dependencies we have omitted so far (like glew and glfw), and because we have yet to write a libretro implementation.

The following are notes based on the dependencies found in Craft, if you don’t find any of these dependencies in another project you don’t need to be concerned about this.

NOTE: I defined SQLITE_OMIT_LOAD_EXTENSION and appended it to CFLAGS since we won’t be needing such functionality for the libretro port.

NOTE2: Although the developer of Craft has gone to great pains to make sure there are as few hard dependencies as possible (and the few there are, have their sources provided inside the project’s codebase) ,there are still some hard dependencies which will require us to pull in some sources later on, like ‘libcurl’. We will ignore this for now, and just dynamically link against it for now until we can get rid of this dependency by compiling it into the core itself.

Step 2 – Skeleton libretro application
We will add a skeleton libretro source file now to the project. We will add these files to the ‘src’ directory:
– libretro.c
– libretro.h

This will be the main program file of our libretro core. Unlike with normal programs, main() is not the default entry point. In a libretro core, there is no default entry point and instead you go through the libretro program lifecycle for initialization and deinitialization of a program. We will return to this later.

Most of the functions right now are purposeful stubs. We will start filling them in in later steps.

NOTE: Because ‘Craft’ is a program that requires no content to run (as in – you don’t need to provide it with say a ROM or an image file in order for it to start), we want the libretro core to start immediately after it has been loaded. Therefore we do a RETRO_ENVIRONMENT_SET_SUPPORT_NO_GAME call.

Step 3 – OpenGL context creation/state management
‘Craft’ uses several cross-platform OpenGL utility libraries in order to function. One is known as ‘glew’ (OpenGL Extension Wrangler Library), the other is called ‘GLFW’.

For libretro GL cores, we resort to several in-house libraries that can serve as replacements for these. For this port we will use two: glsym (equivalent to glew), and glsm (an OpenGL state machine).

We would like this port to work for both desktop OpenGL (2.0+) and mobile OpenGL ES (2.0 and up). Later on you will see that we will have to replace some functions like ‘glGetIntegerv’ inside the source code in order to meet this criteria. For now during this step we will focus solely on integrating glsm/glsym and setting up a working GL context.

We will add the following files to the project:
– deps/libretro-common/glsm/glsm.c
– deps/libretro-common/glsym/rglgen.c
– deps/libretro-common/glsym/glsym_gl.c (for desktop GL)
– deps/libretro-common/glsym/glsym_es2.c (for mobile GL)

In order to use the GL state machine, you first setup the GL state machine context inside the retro_load_game function. You can see this being done here:

https://github.com/libretro/Craft/commit/66125d0beee0ad841e53ef2ed86036bced617e4c#diff-7a88199b5738262c9fda4a6bf68eb68cL163

A couple of notes on the second parameter we pass to glsm_ctl :

context_reset – this function callback is called after the GL context has been initialized. Usually you should try to clean up after yourself here, (re)initialize the graphics, reset the texture state, etc.

context_destroy – this function callback is called after the GL context has been destroyed. Usually you would destroy any allocated objects here related to GL or any other state.

stencil – set this to true if you require a stencil buffer.

The context_reset callback implementation needs some further explanation –

once we know that the GL context has been successfully created by the frontend, we then need to tell the GL state machine to reset its context and to set all default values for the state machine. We can do this by doing the following function calls:

https://github.com/libretro/Craft/commit/66125d0beee0ad841e53ef2ed86036bced617e4c#diff-7a88199b5738262c9fda4a6bf68eb68cR33

This ends the context-related setup part of glsm. From there, the way you use it to simply call this at the start of each retro_run call –

https://github.com/libretro/Craft/commit/66125d0beee0ad841e53ef2ed86036bced617e4c#diff-7a88199b5738262c9fda4a6bf68eb68cR167

and unbind the state again at the end of that same function call, like this –

https://github.com/libretro/Craft/commit/66125d0beee0ad841e53ef2ed86036bced617e4c#diff-7a88199b5738262c9fda4a6bf68eb68cR171

Step 4 – Reimplementing the runloop
A regular program’s flow of control usually starts at the ‘main’ function. ‘Craft’ is no different. This function is defined inside the main.c file. From there, it sets up an infinite while loop that runs as long as the game keeps running. Once we exit the game, it will finally exit the function returning a value, signalling program exit.

To convert a program like ‘Craft’ over to the libretro API, we need to make several modifications so that the libretro application lifecycle is correctly implemented. We will go over some of the required functions to implement, and what to implement inside these callback functions.

To make Craft work as a libretro core, we have had to rewrite the entire main.c file and in specific the main() function. Instead of one long big function, we have had to create a couple of functions which will get called from our libretro function callbacks:

– void main_init(void);
– void main_deinit(void);
– void main_load_game(int argc, char *argv);
– void main_unload_game(void);
– retro_init

This is the main starting point of a libretro core. You can initialize resources here that are needed for the program to run.

We will call ‘main_init’ from this function.
– retro_load_game

This is the function that gets called by the libretro frontend when the frontend passes content to the core and the core needs to do something with it. The retro_load_game function is always called no matter if we are starting the core with content or not.

In the case of ‘Craft’, we do not require any content to be loaded for the program to run. Therefore, we can mostly ignore the parameter ‘info’ passed to this function.

Because ‘Craft’ is a libretro GL core, we have to be aware of something: you can see that we early-return true inside this function. What will happen then is that GL context creation gets set up behind the scenes. Once the GL context is ready to be used, the function callback ‘context_reset’ gets called. Once this happens, we know that our GL context is ready to be used by the core.

This is why we have delayed the execution of ‘main_load_game’ instead of simply calling it inside this function. Instead, we will call ‘main_load_game’ from retro_run when we know the GL context is ready.

– retro_run

This is the libretro core’s equivalent of an infinite while loop, with the exception that retro_run is supposed to represent one video frame’s worth of execution. By default, we assume that the frame time will be equal to what you need for 60 frames per second gameplay, although it is possible to configure the frame time on a per-retro_run basis with libretro as well. This core will not require us to toy with this, so we ignore this aspect for now.

In a libretro core, it is assumed that you need to call the video_cb callback at least once for every retro_run iteration, same with the audio callback. Since “Craft’ doesn’t have any audio code, we won’t bother with this.

As we mentioned earlier during our explanation of ‘retro_load_game’, the initialization of the GL hardware context might take some time until it’s ready. Until then, we cannot use any GL functions. Once it’s ready, the ‘context_reset’ callback will set the static variable ‘init_program_now’ to true. We check for this inside retro_run :

if (init_program_now)
{
main_load_game(0, NULL);
init_program_now = false;
video_cb(NULL, game_width, game_height, 0);
return;
}

As you can see, we call ‘main_load_game’ at this point to finally initialize the game. You will also notice that we set the init_program_now variable to false, so that this function will no longer be triggered. We then do an early return from the function and emit a duped frame. We are now ready to be rendering the game in subsequent iterations of retro_run.

At this point, the main execution flow in subsequent calls of retro_run will be as follows:

– bind the GL state machine

glsm_ctl(GLSM_CTL_STATE_BIND, NULL);

– poll input

input_poll_cb();

– optionally process input

– call main_run so that we iterate the Craft core for one frame.

if (main_run() != 1)
{ }

– unbind the GL state machine

glsm_ctl(GLSM_CTL_STATE_UNBIND, NULL);

– render to screen

video_cb(RETRO_HW_FRAME_BUFFER_VALID, game_width, game_height, 0);

– retro_unload_game

It will call this function upon shutting down the core. In here, we deinitialize/free
any resources directly related to the ‘game’ content we had loaded.

For ‘Craft’, no game content has actually been loaded since the core does not
require external content in order to run.

We will call main_unload_game from this function.

– retro_deinit

This function is called after ‘retro_unload_game’. In here, we will deinitialize all
other resources related to the core itself that weren’t already deinitialized during
‘retro_unload_game’.

We will call ‘main_deinit’ from this function.

Step 5 – Baking in assets

The original ‘Craft’ will compile its shaders from source files stored inside a subdirectory, and it will also look up its textures inside a subdirectory.

Since these shaders are pretty much required for the program to work and because the textures are relatively small, we made the decision to bake these assets into the main code. That way, we will not burden the user with having to store these assets somewhere where the libretro core can find and use them. We can also later on make changes to them easier for the purpose of OpenGL ES compatibility.

To convert the PNG files, we will use a program called bin2c (which can be found on Github), and perform the following commands:

bin2c textures/font.png textures/font_texture.h font_texture

bin2c textures/sign.png textures/sign_texture.h sign_texture

bin2c textures/sky.png textures/sky_texture.h sky_texture

bin2c textures/texture.png textures/tiles_texture.h tiles_texture

We now include these headers inside the src/main.c file.

Craft uses a middleware tool called ‘lodepng’ in order to load and decode PNG files into memory. The original code would use lodepng’s file I/O loading function in order to load PNG files. Since we are going to be using PNG files from memory instead, we will need to use a different function provided by lodepng: lodepng_decode32. This will allow us to point it to a source memory buffer (the converted in-memory PNG file) and then have it dump its decoded output to a destination memory buffer, which we can then provide to OpenGL.

The code we arrived at ended up looking like this:

static void load_png_texture_data(const unsigned char *in_data, size_t in_size)
{
unsigned int error;
unsigned char *data;
unsigned int width, height;
error = lodepng_decode32(&data, &width, &height, in_data, in_size);
if (error) {
fprintf(stderr, “error %u: %s\n”, error, lodepng_error_text(error));
}
flip_image_vertical(data, width, height);
#if defined(HAVE_OPENGL) || defined(HAVE_OPENGLES)
glTexImage2D(GL_TEXTURE_2D, 0, GL_RGBA, width, height, 0, GL_RGBA,
GL_UNSIGNED_BYTE, data);
#endif
free(data);
}

We then call it from the function ‘upload_texture_data’ for each texture file, which in turn gets called like this:

upload_texture_data((const unsigned char*)&tiles_texture[0], tiles_texture_length, &info.texture, 0);
upload_texture_data((const unsigned char*)&font_texture[0], font_texture_length, &info.font, 1);
upload_texture_data((const unsigned char*)&sky_texture[0], sky_texture_length, &info.sky, 2);
upload_texture_data((const unsigned char*)&sign_texture[0], sign_texture_length, &info.sign, 3);

In followup articles, we might touch on the process of baking in the GLSL shaders required for this core to function, and backporting these shaders to GLSL 1.00 so that they can be used with OpenGL ES 2 (a current work-in-progress). It might also touch upon what was needed in order to get keyboard and mouse functionality to work with the libretro core, and some of the other development changes we made to the core so far.


RetroArch/libretro project status update

$
0
0

Craft

qTILoyDWe have decided to port over a promising Minecraft clone to the libretro API. The original source repository can be found here, and the libretro repository can be found here.

Windows/Linux/OSX users can already download this core by going to the Core Updater and downloading ‘Craft’. You can directly start the core since it requires no content to be loaded, it can be started as-is without needing any ROM or content file.

The original Craft upstream repository was a bit barebones, so we have decided to expand this port:

  • Biomes were added (these were located on a branch that was never merged into master), this adds hills / fortresses as can be seen in the screenshot
  • Water was added (this was located on a branch, never merged into master).
  • More sophisticated sunrise/sunset color blending (from Konstrukts).
  • A ‘Jumping Flash’ mode that allows you to jump infinitely into the air all while the camera faces downwards.
  • Configurable draw distance. The draw distance has a big effect on the framerate, a draw distance of 1 or 2 can make this core playable even on very lightweight computers.
  • Configurable field of view.
  • Gamepad support (including analog stick support) configurable analog sensitivity and deadzones, preliminary mouse and keyboard support.
  • Configurable resolutions, up to 4K.
  • A lot of changes under the hood, some of them which are detailed in the Making Of Article.

Some things have been stubbed out so far such as the libcurl support which is required for the login authentication system to work. Network support will undoubtedly become a priority in the upcoming weeks as we plan to flesh out the main game’s content.

So far, one user has reported that he has gotten it to work on a Raspberry Pi although there are still some graphics glitches. It does not work so far on Android/iOS, and we are eagerly intending to fix that as soon as possible.

Expect to see big changes for this core. It’s currently  very bare bones but it won’t be for long.

Rustation

crash_bandicoot-level1
Crash Bandicoot running on Rustation libretro.

This is an up-and-coming Sony PlayStation emulator made by simias (Lionel Flandrin). The libretro repository can be found here, and the upstream repository here.

Rustation requires OpenGL and has been written entirely in Rust instead of C/C++. It interfaces with the libretro API through Rust bindings that have been written some time ago by an external contributor.

Mednafen/Beetle PSX

P4uLsby
Beetle/Mednafen PSX using software resolution upscaling (at 4x).

Mednafen/Beetle PSX has been a libretro core for quite some time now. As a direct result of the work that has gone into Rustation in recent weeks, simias has backported a considerable number of enhancements to the Mednafen/Beetle PSX core.

These include:

CPU Overclocking – Turning this core option on will eliminate drastic framerate drops in many games without any perceivable side-effects. Plenty of PlayStation games struggled to maintain a consistent framerate, Tomb Raider for instance would often drop down to 20fps and even the low teens in certain scenes. Other examples include Castlevania: Symphony Of The Night: after beating a boss, a spot effect would bring the framerate to its knees for around 4 to 5 seconds.

Resolution upscaling – Mednafen/Beetle PSX is no longer limited to native resolution but can now  be upscaled to 2x , 4x or 8x its original size. This greatly enhances the quality of the graphics at the cost of performance (and some minor graphics glitches when going above 2x). The graphics are still software-rendered.

Dithering – Dithering would be used by Nintendo 64 and/or PlayStation games to simulate higher color depth at the side effect of having some dithering patterns which a CRT TV would smooth over anyway and make nearly imperceptible. The alternative would have been color banding which would have been worse and definitely noticeable. However, dithering is a little more noticeable now on high definition screens than it ever was on a CRT. Dithering is now configurable, it can be turned off, left to its original native scale or upscaled depending on the upscaled resolution (if going above 1x).

This is not all that simias has brought to the table though. The next feature is not yet ready but it will be a definite game changer once a little further along:

Upcoming – OpenGL rendering

Right now work is underway on an OpenGL renderer for Mednafen/Beetle PSX. Essentially this is Rustation’s renderer made to work as a video plugin for Mednafen/Beetle PSX. This is mutually beneficial for both the Rustation and Mednafen PSX project this way, the Rustation graphics renderer can be battle tested against a more mature emulator and Mednafen/Beetle PSX in turn is finally no longer limited to slow software rendering.

Some work-in-progress screenshots. Do note that many things are still missing, you might be able to tell some of them in the current screenshots (missing blending for some textures, no sprites/lines being sent yet to the external renderer, etc.)

GPS1gc2
Mednafen/Beetle PSX using Rustation OpenGL renderer
JjzJ1l9
Mednafen/Beetle PSX using Rustation OpenGL renderer

PCem

vhLet2d

This is a new core that is still a work-in-progress but is steadily coming along together with the help of MoochMcGee. It is a libretro port of PCem, a PC emulator that some could consider a rival to Dosbox.

In terms of features, it supports a large variety of graphics, sound cards and BIOS / machine models. It is also unique in that it has 3Dfx Voodoo support. There is also preliminary nVidia Riva 128/TNT emulation that might be further fleshed out.

Together with an x86/x64 dynarec, it has been possible to play Pentium/Windows 9x-era games with 3Dfx Voodoo support at playable framerates.

Right now, this core is not yet ready but is making considerable strides. Video is now working, the runloop is more or less implemented, all that remains is adding all the remaining options and improving keyboard/mouse support.

GameGirl

test

This is not a libretro core project but a hardware project. Jean-Andre Santoni (Lakka head developer) and engineer David Perrenoud have created an open-spec portable handheld console called the ‘GameGirl’.

Please check it out and like it .

It consists of a 120Hz 320×240 display connected to a Raspberry Pi Zero.

Its main distinguishing points are:

  • Uses the Lakka distribution (and therefore by all accounts is a RetroArch/Libretro handheld portable game console)
  • Thin and tiny (only 66 mm x 99 mm)
  • Very inexpensive
  • Ability to shutdown at any time because of the Lakka distribution (it has a read-only filesystem which allows the user to turn off the device at any one time without the risk of corrupting the filesystem)
  • Future prototyps will include a thin-film rechargeable battery and a proper speaker (current prototypes will have a buzzer
  • An inexpensive and convenient portable solution for Lutro-based games (Love2D based games) and the Craft Minecraft core is an enticing offer.

By liking the project on Hackaday, you can help along its funding.

RetroArch 1.3.2 released

$
0
0

From now on, there will be more frequent rolling updates.

We are close to automating releases on the buildbot so that we can have weekly releases for the most prominent platforms.

Version 1.3.2 is available here:

http://buildbot.libretro.com/stable/1.3.2/

I will add OSX 32bit and PowerPC releases to this later on. PS3 will be back at some later undisclosed time, same with original Xbox and 360.

Regarding the releases from this point on: give us as much feedback as possible, and with each week we can try to address some of this feedback and make RetroArch better. A ‘Release early, release often’ approach instead of the drought of stable releases that was the norm before will hopefully result in more sustained progress.


RetroArch 1.3.4 released

$
0
0

Version 1.3.4 has just been released.

Builds can be found here.

Old MacOS X builds (PowerPC and 32bit Intel) will be retroactively added soon, since these builds can’t be automated.

Graphics improvements


This is the simplified ribbon animation shown here. The more advanced one should be fullspeed on any GPU from 2008 and later.

With version 1.3.4, RetroArch is encroaching upon launcher territory and will try to position itself as a fancy convenient 10-foot interface with plenty of eye candy.

To start with, the XMB menu driver now has a ribbon animation running in the background that looks very similar to the graphics you’d see on the PS3 GameOS. There are two variations on this, a simplified version (which should run at fullspeed on even old 2005-2006-era GPUs) and a more advanced version with light sourcing.

The background color gradient can be changed easily by going to Settings -> Menu and changing Background Gradient. There are several predefined color variations you can select from.

Thumbnails and boxart

h0ybHdYWe now have our own server that is going to be serving up boxart/thumbnails to the frontend client. We call our thumbnail collection project ‘libretro-thumbnails‘.

Content in the horizontal playlist will have thumbnail icons shown next to it. By pressing the Y button on your RetroPad, you can switch inbetween the different thumbnail modes: Title screen, Snap shot, and Boxart.

In order to grab this boxart, you can go to Online Updater -> Update Thumbnails. Download the boxart set for the system you need and it will automatically extract it to the thumbnails directory. The boxart sets will be updated daily and it’s possible for people to contribute.

Nintendo 64 – LLE RDP and graphics plugin unification

There’s a lot I could show but Themaister felt it would be premature to post anything yet, so instead I will just point you to the public information that is already out there:

http://forum.pj64-emu.com/showthread.php?t=5627

This is an entirely new project using Angrylion merely as a base but taking full advantage of the compute shader capabilities of OpenGL 4.3+/Vulkan. PLEASE NOTE: NOTHING IS READY YET, NOT EVEN SOMETHING THAT CAN BE PLAYED, so unless your idea is to watch some pictures, there is nothing to badger the developer about yet, so please don’t :).

At the same time while this is going on, I am busy consolidating all of the various graphics plugins in Mupen64 libretro so that we can arrive at a hybrid renderer solution. Most of the code in these HLE RDP plugins is about 80 to 90% copy pasta so it should not prove too hard unifying Rice/GLN64/Glide64/Gliden64 and arriving at one video renderer that combines the best of all of them. We could then allow for several different code paths (some meant for performance, others meant for accuracy) instead of requiring users to have to switch between graphics plugins and restarting Mupen64 again.

PlayStation

B3dZLbt

Simias has been putting a lot of effort into Rustation lately and the Mednafen/Beetle PSX-compatible renderer plugin. It’s not ready for release-time yet but we (well, mostly a guy called r5) are steadily working on a C++ conversion of the Rust code.

Some of the features that have been implemented so far include:

  • Alpha blending – not yet complete and accurate but covers most of the cases.
  • Internal resolution upscaling – up to 8x.
  • Bilinear and 3-point filtering sampling – the latter is the sub-bilinear filtering algorithm from the N64.
  • Preliminary perspective correction – this is Rustation-only for now.

In other news, PBP support has now been integrated into Mednafen/Beetle PSX. It won’t support real PS3/PSP PBP images yet, so you will have to go with pre-converted PBP images that are not encrypted. However, it might be possible to have it run real PBP encrypted images as well later on.

I’m going to be working on helping r5 out with this C++ conversion of the GL renderer so we have something preliminary to show soon.

Miscellaneous release notes

  • (Android) An important bug got fixed that prevented two buttons from being toggled at the same time. This should help with arcade games a lot.
  • (Android) Devices which qualify as a games console (like the Nvidia Shield Tablet/Console) will boot into the XMB menu driver instead of the default touch-oriented GUI instead.
  • (Mac OS X) Library / Application Support / RetroArch is used for storing configuration files now like it was in the past. Sorry about this inconvenience in the past version.
  • (Vulkan / Windows) Should be usable on Windows now.
  • Arcade games can be scanned now for FBA and MAME cores.

Lakka and GameGirl

http://www.lakka.tv/articles/2016/05/03/new-major-release/

Q5gpo3F

A new version of Lakka is available at the same time as the RetroArch 1.3.4 release.

Here is a brief changelog:

  • Service management, start or stop samba, ssh, and bluetooth from the GUI
  • Cuboxi and Hummingboard builds fixed
  • Thumbnails updater, with 3 types of thumbnails
  • XMB PS3 Ribbon animation
  • DualShock bluetooth auto pairing
  • Switching audio devices from the GUI
  • Support for some chinese DualShock clones in bluez
  • FBA Scanning
  • DAT updated to 2016
  • Drop shadows in XMB
  • XMB Theme switching, with an alternative theme: RetroActive
  • Bluetooth and WiFi working on RPi3
  • RetroArch and libretro cores updated

Speaking of Lakka, their sister project GameGirl has been garnering a lot of attention so far on Hackaday. They even ran their own story on it here.

GameGirl won a grand total of $177 for seed funding during the Hackaday 2016 Prize contest, second highest project in terms of funding.

Basically, what we want to achieve with GameGirl is just a low-cost practical handheld version of a Lakka/RetroArch device. It is basically a Raspberry Pi Zero with a very nice shell and buttons provided by 8bitdo, along with a 120Hz screen.

Contributions

The Lakka project (its lead developer, Kivutar, in particular) needs your help and support. Here is a wish list of hardware he currently needs in order to help improve the project and which he hasn’t been able to obtain yet. See the contribute section here.

If you want to get in touch with us about the GameGirl project, please visit us here through Discord.

Next big point release and stuff we are trying to get done by then

This list is subject to change and meant more as a statement of intent and an installment plan.

  • We’re going to get that Apple TV port out of the door for the next release.
  • Might be time to get that Windows Phone/UWP port out of the door before Windows Phone is completely dead :).
  • Likewise for Blackberry 10, time to get that port out of the door again before the platform is completely dead. A lot of mobile phone casualties of late. Seems Android and iOS are the only ones left standing at this point with even Intel exiting the mobile arms race.
  • Reicast working on mobile platforms.
  • Some exciting new cores.
  • Other features I can’t talk about yet.

Mednafen/Beetle PSX HW – Alpha test version

$
0
0
Parasite Eve with the experimental GL renderer. Note the screen residue glitches at the bottom.

Here is the first release of Mednafen/Beetle PSX HW. You can download this core right now for Windows, Linux, and OSX.

NOTE: THIS IS AN ALPHA VERSION AND IT IS NOT REPRESENTATIVE OF THE UPCOMING BETA VERSION. PERFORMANCE RIGHT NOW IS A LOT LOWER THAN WHAT IT WILL BE FOR THE BETA VERSION. EXPECT BUGS TOO.

See a complete screenshot gallery here.

Where to get it?

Rage Racer using experimental GL renderer
Final Fantasy VII using experimental GL renderer

Go to RetroArch, go to Online Updater, go to ‘Update Cores’, and download ‘PlayStation (Mednafen PSX HW)’. You might need to update your core info files first before this will show up properly. To do this, go to ‘Online Updater’, and select Update Core Info Files’.

System requirements

You need to have a GPU that supports at least OpenGL 3.3 core context in order to use this. It might be possible to lower GPU requirements in time but now is not yet that time.

OpenGL

Gran Turismo 1 with the experimental GL renderer.

We have added an OpenGL renderer to Mednafen PSX. This renderer is based on simias’ GPU renderer for his Rust-based PlayStation emulator, Rustation.

Lots of people worked hard on bringing this to you. It was a joint team effort between r5z, simias, zeromus, and me to bring this from Rust over to C++, and in a way so that it still benefits Rustation as well.

This is probably the first OpenGL renderer for PSX that is not based on outdated fixed-function OpenGL code and which is, actually, well, open-source. Because we can assume shaders will be there, we can get reasonably close to emulating texture windows accurately (with Pete’s OGL1 GPU plugin, there were codepaths for doing it with paletted textures – the hacky approach – and the pixel shader approach). Therefore, the renderer is still kept pretty simple and easy to understand.

Unfinished business

Resident Evil 2 with the experimental GL renderer.

There are several parts which are still not finished:

    VRAM-to-VRAM copies right now are completely broken. You might see several glitches during FMVs and/or other scenes that require framebuffer manipulation. Final Fantasy 7/8’s pre-battle swirls come to mind as examples of that.
    There are still several texture updating problems. The water in Tomb Raider 2 for instance can initially appear flat shaded until you take a savestate. Other problems include Resident Evil 3’s sprite-based inventory system, when you add or remove items from this list, the changes might not be reflected on-screen.
    There are still some graphics issues. One example is the broken opacity boxes around Silent Hill’s objects.
    There are still several crippling performance bottlenecks with this GL renderer. The first priority is getting the rendering to be as accurate as the software renderer until optimization becomes a priority.
    Toggling fullscreen will give you a black screen. This is yet to be implemented.
    There are currently some near/far issues right now where objects very close to the projection camera can appear glitched onscreen.
    There might still be some resolution issues where some portions of the screen don’t get clipped away as they should, so you might see some onscreen garbage in places that are normally obscured and not visible.

Options

Picture of Tomb Raider with nearest point filtering Picture of Tomb Raider with 3 point N64 filtering Picture of Tomb Raider with bilinear filtering

Let’s detail some options for this hardware-based core :

Internal GPU Resolution (Restart) – This lets you change the internal resolution. NOTE: In this alpha version, it will crash if you try to change this at runtime. Here is a way to work around it: go to Quick Menu -> Options, change ‘Renderer’ to ‘software’, restart the core. Change the Internal GPU Resolution. Then change ‘Renderer’ back to ‘opengl’, and restart. Your changes should take effect now. Right now the max resolution you can set it to is 8x.
Texture filtering – This only works with the OpenGL renderer. You can toggle between ‘nearest’ point filtering, 3-point filtering (N64-style quasi-linear filtering), and plain bilinear filtering. Both 3-point filtering and bilinear filtering can impact performance negatively right now, and on average bilinear filtering has less graphics issues than 3-point so far. If you want the best performance, go with ‘nearest’.
Internal color depth – This only works with the OpenGL renderer. You can toggle between 32bpp (32bit color) and 16bpp dithered mode.
Wireframe mode – It will toggle between wireframe mode and filled shading mode (the default).
Display full VRAM – This requires a restart in order to take effect. This allows you to see all the VRAM banks on-screen. Mainly useful for developers only.

Warning for people using Cg shaders

Street Fighter Ex Plus Alpha with the experimental GL renderer and bilinear filtering enabled.

Cg shaders won’t work with this core as long as it requires OpenGL 3.3 core context. Cg is no longer alive from a public consumption perspective and as such they never saw fit to adding support for GL 3.3 core context.

So make sure to disable any Cg shaders you had running before trying to run this core.

When/if we lower GL requirements, this might no longer become an issue, but you will always have a better experience with this plugin using GL 3.3 or later.

Bug reports

Tekken 3 with experimental GL renderer

You can post bugs and graphics issues here (preferably with screenshots).

https://github.com/libretro/beetle-psx-libretro/issues/43

Other Mednafen/Beetle PSX improvements

Final Fantasy VIII with experimental GL renderer

PBP support is now much more mature. There is support for encrypted official PS3/PSP PSOne games added now thanks to Zapeth.

He also submitted some accuracy improvements which should give the emulator a better score with the PSX benchmark test programs.

Upcoming news/announcements

Metal Gear Solid
Metal Gear Solid

In other news, expect a new point release of RetroArch soon. No Apple TV and Windows UWP support yet, but Blackberry 10 might be coming back for the 1.3.5 point release.

Components of a Source Engine Libretro Frontend

$
0
0

When combined with a 3D game engine, such as the Source engine, the libretro framework is able to run on any surface in the game.

Replacing the simple game texture shown on an in-game TV screen with a fully functional libretro instance can do anything ranging from playing a full-length video with the ffmpeg core, to running interactive homebrew software, all on the in-game screen.

Adding libretro support to a 3D frontend allows a wide range of media to be loaded using libretro’s ever growing collection of cores. Only a few key components need to be in place to get started. This article outlines what was required to add libretro support to the Source engine for the 3D-frontend Anarchy Arcade (www.anarchyarcade.com).  The process for other popular game engines is also very similar.

The Source engine has three notable road bumps when implementing libretro.

First is that the Source engine is DirectX, while libretro requires OpenGL for 3D acceleration.  Without OpenGL, only the cores that support software mode will be able to function.  Generally, this means only 2D cores will work properly, but technically it will depend on what the core supports.

The second road bump is audio.  Anarchy Arcade uses PortAudio (www.portaudio.com) to play the audio streams that libretro provides.  However, the Source engine itself may be capable of playing such audio streams more optimally.  What ever the sound solution, it is still simple enough to get the audio streams from libretro and send them where ever they need to go.

The third road bump is frame scaling.  The resolution of the frame that libretro generates will not match the resolution of your texture.  The frame data must be re-scaled in real time before it can be written to the texture.

After libretro is initialized, a core module must be loaded and its interface built so that it can communicate with your frontend.  The libretro core will be asking your frontend for different variables and options that your frontend must provide answers to.  The core will also be delivering the video buffer and the audio streams to your frontend.

All that your frontend needs to do is display what libretro gives it.  Your frontend can also forward keyboard & gamepad input to the libretro core so the user can interact with it.  This communication all takes place during the main loop.

Source Engine Main Loop

After libretro is initialized, its retro_run method needs be able to be called as often as possible, without interfering with normal engine operations.  A good place to plug your code into the Source engine for this is in CAutoGameSystemPerFrame::Update.

With a core loaded and retro_run being called from your main loop, libretro is fully functioning.  Now the frontend just needs to display what it is given, and forward user input to the libretro core.

Source Engine Texture Access

Cores that have software rendering (such as most 2D cores) will basically require a memcopy of the frame that libretro gives your frontend.  The Source engine has a special kind of texture called a procedural texture that allows you to write directly to its pixels, or do memcopies onto it.  It works by plugging into the logic of the ITextureRegenerator::RegenerateTextureBits method to do a memcopy of the libretro frame buffer.  This effectively draws what ever libretro is rendering onto the in-game texture.

Source Engine Input Capture

Finally, your frontend needs to send button state info to the libretro core so that the user can interact with it.  In the Source engine, button states can be determined whenever needed by using the vgui::input()->IsKeyDown method.

Libretro Frontend on Source Engine w/ VR Mode

After all of these components are implemented into your frontend, you can use your interactive texture on how ever many surfaces you want.  There is no additional performance impact for using it on more than 1 surface.  You can also optimize your implementation so that memcopies only occur when they need to by assigning a CEntityMaterialProxy to the material that references your procedural texture.  With these 3 simple components, you are able to run many of the libretro cores available at www.libretro.com, or your own homebrew software on the in-game screens of your Source engine 3D frontend.

First ever revolutionary N64 Vulkan emulator coming soon – only for libretro (paraLLEl)

$
0
0

140228_38849_ultra

For years, Nintendo 64 emulation has been pretty bad and lagging significantly behind Nintendo Gamecube/Wii emulation. At least 90 to 95% of the remaining problems are at the RDP level, the N64’s video subcomponent chip. By moving away from High-Level Emulation of the RDP, we could solve most of the remaining problems. The problem has been that for a long time, it seemed impossible to do this at playable speeds. Software rendering is too slow for a GPU from this timeframe, and older versions of OpenGL have too many crippling limitations in order to allow for a 1:1 reprogramming and port of Angrylion to GL.

At last, this dire situation will change in the upcoming days and we can finally release to the public something that will revolutionize N64 emulation forever so that we can move away from all of the hacky HLE video plugins that have been released in recent years.

The world’s first-ever low-level N64 video plugin implemented using the Vulkan API!

And not just any video plugin either. This is a reimplementation/port of Angrylion to Vulkan. This will be the first time most will be able to get anywhere close to playable speeds with an accuracy-based N64 video renderer.

This hardware renderer is unique for the following reasons:

  • This is the first N64 emulator project ever so far to receive Vulkan support.
  • This is the first time ever that an emulator takes advantage of asynchronous compute (exclusive only to DirectD12/Vulkan) for hardware rasterization of an emulated GPU.
  • This is the first time ever that the Angrylion renderer has been ported to a graphics API. It is the first time an RDP LLE video renderer for N64 has been capable of running at fullspeed. It marks a shift away from decades of inaccurate high-level emulation of the N64’s RDP which made for buggy N64 emulation in general.

How to use it?

When it will be released in the upcoming days, this is what you will need in order to use it.

  • You will need the latest RetroArch version (either nightlies or the upcoming 1.3.5 version). The libretro API has been updated to make asynchronous compute cores possible, hence why ‘Mupen64plus HW libretro’ will not work on any older version of RetroArch.
  • Your video card also needs to support the Vulkan graphics API.

When RetroArch 1.3.5 gets released

Download the new RetroArch 1.3.5, go to ‘Online Updater’, go to ‘Core Updater’.

From there, go to ‘Experimental’, and download Mupen64plus HW. This will download the Vulkan-enabled Mupen64plus core.

Before trying to use it, make sure your video card supports the Vulkan API otherwise it won’t work!

Why RDP LLE? Why is this significant?

For years, Nintendo 64 emulators have fixated upon a High-Level Emulation approach to emulate the RDP, the N64’s video rasterizer. Examples include Glide64, Rice, GLN64 (and its recent fork, GlideN64).

It is a practical but imperfect way of emulating the RDP for many reasons:

  • These plugins require numerous game-specific hacks and workarounds. It becomes a real maintenance chore and there’s plenty of missing graphical effects to this day. Examples include: missing lens flares in Turok: The Dinosaur Hunter, corrupt backgrounds in Killer Instinct Gold and GoldenEye 007, fiddly auxilliary frame buffer glitches, inaccurate approximations of graphical effects due to combiner issues, etc.
  • Most of these HLE RDP plugins recycle a lot of old code. For instance, Gliden64 is mostly a collage of GLN64 + Glide64 code, but the code recycling goes deeper than that. Low-level triangle rasterization functions in both Glide64 and Gliden64 are borrowed from Z64 GL, an RDP plugin by Ziggy. The problem is that bugs still exist in these sections of the code. Most of the low-level rasterization functions that keep being borrowed in these high-level plugins are directly responsible for many of the remaining glitches you can see. And since the code was written by outside people who are no longer active in the scene, it doesn’t seem likely it is ever going to get fixed.
  • There are other legacy issues. The most notorious one of all is of course Glide64, which originally targeted (you guessed it) the obsolete 3Dfx graphics API Glide. We are talking GL 1.2 / 1.3-ish era here, really stone-age. An OpenGL wrapper for Glide had to be written around Glide64 in order to get it to run with OpenGL-supported video cards in the first place, but the wrapper code unfortunately is far from optimal. Other plugins like Z64 GL still seem to use OpenGL 1.4x-era code and lots of questionable fixed function wrapper code.
  • Many games use custom RSP microcode to do certain game tasks. For instance, Rogue Squadron uses custom RSP microcode for terrain heightmap generation, while games like Resident Evil 2 and Legend of Zelda: Ocarina of Time use the RSP for video and image decompression routines. Usually this would call for a high-level implementation/approximation of what the game would expect to be returned to the RDP, and to also implement corresponding high-level displaylist implementations on the RDP rasterization side. Many games simply have never had their custom microcode properly reverse engineered, so the only way to play these games is to use a combination of a low-level RSP plugin and a low-level RDP renderer. Most of the existing microcode was actually handed to devs on a silver platter and it seems the remaining microcodes will probably never be reversed for this reason.
  • You run into pretty big bottlenecks with traditional GL rendering for which no real solutions exist, frame buffer bottlenecks, depth buffer bottlenecks, etc. More recent versions of OpenGL (4.3+) have made it possible to fix some of the issues, like better depth compare, faster and more efficient framebuffer to framebuffer copying, but it’s still honestly a big inoptimal mess.
  • Coverage emulation is usually completely stubbed out in HLE video plugins.
  • All of these plugins have so far completely avoided trying to emulate the VI interface. The VI interface basically reads from the RDP’s frame buffer and sends it to the digital-to-analog converter to create the video output. Along the way it applies several postprocessing effects including what appears to be 8x MSAA. I guess some can blame for this VI interface for leading to the ‘smudged’/’smoothed out’/’blurry’ look of many N64 games. But hey, we’re going for authentic here :)

Enter this new renderer. It takes as a base Angrylion (the most accurate RDP rasterizer yet so far) and it uses compute shaders to transfer the workload to the GPU instead of the CPU. Angrylion has been known to render nearly all games accurately unlike regular HLE N64. The only problem has been that it has been too slow to run at full-speed because of it being completely software rendered, which puts all the strain on the CPU. RDP LLE changes that around so that this rendering bottleneck is completely gone. With RDP LLE, the only remaining bottleneck will be the interpreter RSP plugin that a low-level RDP plugin has to use.

Work remaining to be done

With this video renderer we have aimed for a GL 4.3 / Vulkan featureset in order to escape most of the bottlenecks and limitations that usually drags N64 emulation down. From now on, there will be two big remaining tasks to be done:

  • We will have to port the code over to OpenGL 4.3+. Lower subsets of OpenGL won’t work as this renderer requires compute shader support.
  • With the RDP bottleneck being completely gone with this renderer, RSP has now become the main bottleneck. We will have to write a recompiler for the RSP in order to attain even better performance and reduce the RSP bottleneck as much as possible. So far, only Project64 has an RSP recompiler like this, but there are plans of using Daeken’s generic recompiler system in order to come up with something equivalent for Mupen64plus libretro.

Asynchronous compute raymarching libretro test core

72AE6jG

In order to make this renderer possible, extensions to the libretro API had to be added.

For educational reasons and in order to serve as a proof of concept on how to make your own libretro core that takes advantage of the recently added asynchronous compute capabilities, a test core has been made, called ‘libretro-test-vulkan-async-compute‘.

It is a basic test program that demonstrates raymarching being done in Vulkan. We’d very much like to see people improve upon this and collaborate to make a more impressive core out of it.

You can find the sourcecode for this sample test core inside RetroArch’s source code directory tree (cores/libretro-test-vulkan-async-compute in specific).

Conclusion

It has been a long time coming, but finally with paraLLEl, N64 emulation can finally become ‘good enough’ and we no longer need to have patchwork renderer plugins that try to fix graphics issues on a per-game basis.

Lutro – easy retro game creation powered by Libretro

$
0
0

We are going to be making Libretro (and RetroArch, by extension) more usable for content creators, and the first part in that endeavor is the official launch of Lutro.

Lutro is an in-development Love 2D reimplementation written in Lua and implemented as a libretro core. With Lutro, it is possible to easily create Lua games with no knowledge of C being necessary, or having to compile any code.

Sample games

To demonstrate the flexibility and power of Lutro, we have assembled a few Lutro-based games which you can freely download from our server. They are purposefully kept simple so that the content creator can use them for their own attempts at creating a game.

LutroPong

l6sLDcD

A recreation of the game Pong for Lutro.

Sienna

FG38fh0

This is a Love2D-based endless runner game that has been ported to Lutro.

Platformer
uFAfcFj

One of kivutar’s first proof of concept demos showing off Lutro. It’s a scrolling 2D platform game with no real game mechanics beyond jumping.

LutroSpaceship
O51KsjH

Another 2D platformer showcase example for Lutro, this time illustrating how a Metroidvania-style game could work as a Lutro game. It has several screens which were implemented and some game mechanics including combat, item collecting, jumping, etc.

The Game Of Life
MMxo6Cj

A recreation of Conway’s The Game Of Life. Press one of the buttons to regenerate the algorithm again. Can be quite CPU intensive depending on the system and environment you run Lutro on and/or whether or not LuaJIT is available.

Tetris

oWfW8TM

A recreation of Tetris for Lutro.

How to use the existing Lutro games

Start up RetroArch (version 1.3.6 or later).

Make sure you have downloaded the Lutro core first. To do that, do the following:

Downloading the Lutro core

1. Go to ‘Online Updater’.

2. Go to ‘Core Updater’.

3. Browse through the list and select ‘Lutro’. This will download the core. Once done, exit this screen and go back to the main menu by pressing the back button.

Downloading a game

There are several games we allow you to download from our servers.

1. Go to ‘Add Content’.

2. Go to ‘Download Content’.

3. Select the folder ‘lutro’.

4. Download any of the games. Once you’re done, press the back button or another key to go back to the main menu.

5. Go to ‘Load Content’.

6. Go to ‘Select Downloaded File and Detect Core’.

7. Go to the lutro directory.

8. Select the subdir of the Lutro game you want to play.

9. Select ‘main.lua’, and the game will start up.

Case study example : LutroSpaceship

In order to show off how Lutro could be used to create a good 2D game, kivutar has created a Metroidvania-style platformer game. It’s called ‘LutroSpaceship’. In it, you are thrown into a 2D Metroidvania style world with multiple screens you can explore. You can swing your lightsword to kill enemies. Enemies will drop collectibles that you can pick up. There are several traps you will have to avoid such as a laser beam. The game ends once you have reached a passageway.

As a budding content creator, you can pick up where we left off in this demo and continue the game from there. All it takes is some familiarity with how Love2D-based games work, a text editor and editing the Lua source files. After having edited these files, you can run the game again and immediately sample your changes.

Work in progress

Be aware that Lutro right now is not feature-complete with Love2D.

  • There are several missing API functions that still have to be implemented. View the list here. We will keep this updated as we go along.
  • We are in the process of adding an audio mixer to Lutro to complete some of the remaining missing Love2D functionality.
  • Right now, there is no hardware rendering acceleration, everything is done mainly on the framebuffer. This would not be ideal for games that rely heavily on 3D-based rendering or transformation/scaling but it does have the advantage that the Lutro core/games can run on systems where there is no OpenGL support to begin with.

RetroArch 1.3.6 released

$
0
0

RetroArch keeps moving forward, being the reference frontend for libretro and all. Here comes version 1.3.6, and once again we have a lot to talk about.

Where to get it

Windows/Mac/iOS (build only)/Nintendo/PlayStation – Get it here.

Android: You can either get it from F-Droid or from Google Play Store.

Linux: Since RetroArch is included now on most mainline Linux distributions’ package management repository systems, we expect their versions to be updated to 1.3.6 shortly.

I will release versions for MacOSX PowerPC (10.5 Leopard) and 32-bit Intel MacOS X 10.6 (Snow Leopard) later on, maybe today or tomorrow.

Usability improvements

Windows Drag and Drop support

Courtesy of mudlord, with the Windows version, you can now drag and drop a ROM (or any other content) onto RetroArch’s window, and it will attempt to load the correct core for it. If there is more than one core available for the type of content you dragged and dropped, it will present you with a slidedown list of cores to select from.

Vastly improved content downloading features

Starting with v1.3.6, RetroArch users can download compatible freeware content, such as the shareware release of Doom, right from the app. This video goes through the steps, which include fetching the core from the online updater, fetching the content from the repository and then launching the core and content we just downloaded.

Menu customization and aesthetics – XMB and MaterialUI

RetroArch v1.3.6 adds support for a number of themes in the default mobile menu, including both bright and dark themes.

There’s also the ability now to set a custom wallpaper in XMB and be able to colorize it with a color gradient. To do this, you go to Settings -> Menu, you set a wallpaper, and from there you have to set ‘Menu Shader Pipeline’ to OFF. You can then choose from one of the color palettes in ‘Color Theme’ in order to shade the background wallpaper, or just select ‘Plain’ in case you don’t want to colorize it.

Undo Load/Save State

Have you ever gotten through a tough part of a game and wanted to make a savestate only to hit the “load state” button instead and have to do it all over again? Or maybe you were practicing a particularly difficult maneuver–for a speedrun, perhaps–and accidentally saved a bad run over your practice point because you hit “save state” instead of “load state”? While savestates are considered one of the great advantages to emulating retro games, they can also lead to these frustrating situations where they wipe out progress instead of saving it, all because of one slip of the finger. RetroArch now has the ability to undo a save- or load-state action through some automatic state-shuffling that happens behind the scenes, so you never have to worry about these situations again.

Undo Load State – Before the ‘current’ state is altered by e.g. a ‘Load Savestate’ operation, ‘current’ is saved in memory and ‘Undo Load State’ restores it; you can also undo this option by using it again, which will make you flip-flop between 2 states.

Undo Save State – If there was a savestate file that was overwritten, this option restores it.

New Features

The main event of RetroArch 1.3.6 is obviously the fact that it makes it possible to run the N64 Vulkan core, paraLLEl. Previous versions of RetroArch will not be able to run this because of the new extensions to libretro Vulkan which we had to push to make this renderer possible.

Vulkan

Async compute core support – ready for ParaLLEl

It was already possible to run Vulkan-enabled libretro cores, but with this release, a few crucial features have been added. Support for queue transfers was added and a context negotiation interface was added.

With this we can now use multiple queues to overlap compute and shading in the frontend level, i.e. asynchronous compute. ParaLLEl would certainly not have been as fast or as effective were it not for this.

ParaLLEl now joins triple-A games like Rise of the Tomb Raider and Doom in heavily relying on Vulkan’s async compute capabilities for maximum efficiency. A test core was also written as a proof of concept for this interface.

If you want to read more about ParaLLEl, we have a compendium blog post for you to digest here.

Supports Windows, Linux, Android equally well now

The previous version already had Vulkan support to varying degrees, but now we feel we are finally at the point where Vulkan driver support in RetroArch is very much mature across most of the supported platforms.

Vulkan should work now on Android, on Windows, and on Linux, provided your GPU has a working Vulkan driver.

On Linux we now support even more video driver context features, such as VK_KHR_display support. This is a platform-agnostic KMS-like backend for Vulkan, which should allow you to run RetroArch with Vulkan without the need of an X11 or Wayland server running.

On Windows and Android, we include Vulkan support now. Vulkan has been tested on Android with NVIDIA Shield Tablet/Console, and both work. Be aware that there are some minuscule things which might not work correctly yet with Vulkan on Android. For instance, orientation changing still doesn’t work. This will be investigated.

Max swapchain images – driving latency even lower with Vulkan and friends

RetroArch already has built up quite a reputation for itself for being able to drive latency down to very low levels. But with new technologies, there is always room for improvement.

Max amount of swapchain images has now been implemented for both the DRM/KMS context driver for OpenGL (usable on Linux) and Vulkan now. What this entails, is that you can programmatically tell your video card to provide you with either triple buffering (3), double buffering (2) or single buffering (1). The previous default with DRM/KMS was 3 (triple buffering), so setting it to 2 could potentially shave off latency by at least 1 frame (as was verified by others). Setting to 1 won’t often get you single buffering with most monitors and drivers due to tearing and they will fall-back to (2) double buffering.

With Vulkan, RetroArch can programmatically infer to the video card what kind of buffering method it likes to be able to use, a vast improvement over the nonexistent options that existed before with OpenGL (from a platform-agnostic perspective).

What Vulkan brings to the table on Android

Vulkan has been tested to run on Android devices that support Vulkan, like Shield Tablet/Console. Latency has always been very bad on Android in the past. With Vulkan, frame times are significantly lower than with OpenGL, and we no longer have to leave Threaded Video enabled by default. Instead, we can turn off Threaded Video and letting RetroArch monitor the refresh rate dynamically, which is the more desirable solution since it allows for less jittery screen updates.

Audio latency can also be driven down significantly now with Vulkan. The current default is 128ms, with Vulkan we can drive it down to 64 or even 32ms.

Couple this with the aforementioned swapchain images support and there are multiple ways to drive latency down on Android now.

OpenGL music visualizer (for FFmpeg-enabled builds)

Versions of RetroArch like the Linux and Windows port happen to feature built-in integrated FFmpeg support, which allows you to watch movies and listen to music from within the confines of RetroArch.

We have added a music visualizer now. The scene is drawn as a cylindrical mesh with FFT (Fast Fourier Transform) heightmap lookups. Different colors are shaded using mid/side channels as well as left/right information for height.

Note that this requires at least GLES3 support (which is available as well through an extension which most GPUs should support by now).

Improvements to cores

TyrQuake

e0ia1Qg

User leileilol contributed a very cool feature to TyrQuake, Quake 64-style RGB colored lighting, except done in software.

To be able to use this feature, you need to create a subdir in your Quake data directory called ‘maps’, and you need to move ‘.lit’ files to this directory. These are the lighting map files that the Tyrquake core will use in order to determine how light should be positioned.

From there on out, you load up the Tyrquake core, you go to Quick Menu -> Options, you enable Colored Lighting. Restart the core and if your files are placed correctly, you should now see the difference.

Be aware that in order to do this, the game renderer shifts to 24bit color RGB rendering, and this in turn makes things significantly slower, although it should still be fairly playable even at higher resolutions.

View the image gallery here.

To download this, go to ‘Add Content’ -> ‘Download Content’. Go to ‘Tyrquake’, and download ‘quake-colored-lighting-pack.zip’. This should extract this zip to your Downloads dir, and inside the Quake directory. From there, you can just load Quake and the colored lighting maps should be found providing the ‘Colored Lighting’ option has been enabled.

SNES9x emulator input lag reduction

A user on our forum, Brunnis, began some investigations into input latency and found that there were significant gains to be made in Super Nintendo emulators by rescheduling when input polling and video blitting are being performed. Based upon these findings and after some pull requests made to SNES9x, SNES9x Next, and FCEUmm, at least 1 to 2 frames of input lag should be shaved off now.

Do read this highly interesting forum thread that led to these improvements here.

News for iOS 10 beta users

There is now a separate version for iOS 10 users. Apple once again changed a lot of things which makes it even more difficult for us to distribute RetroArch the regular way.

Dynamic libraries cores cannot be opened from the Documents directory of the app anymore in iOS 10. They can be opened from the app bundle, as long as they are code-signed. This reverts back to the previous behavior of RetroArch, where the cores need to be in the modules directory of the app bundle.

Go to this directory:

https://github.com/libretro/RetroArch/tree/master/pkg/apple

and open RetroArch_iOS10.xcodeproj inside Xcode.

Note – you will need to manually compile the cores, sign them, and drag them over to the modules directory inside Xcode.

Example –

1. You’d download a core with libretro-super.

A quick example (type this inside the commandline)

git clone https://github.com/libretro/libretro-super.git

./libretro-fetch.sh 2048

./libretro-build.sh 2048

This will compile the 2048 core inside /dist/ios.

2. Move the contents of this directory over to the ‘modules’ directory inside the RetroArch iOS 10 Xcode solution. It should presumably handle signing by itself.

Bugfixes/other miscellanous things

  • Stability/memory leak fixes – We subjected RetroArch to numerous Valgrind/Coverity/Xcode Memory leak checks in order to fix a plethora of memory leaks that had reared their ugly heads inbetween releases. We pretty much eliminated all of them. Not a sexy feature to brag about, but it involved lots of sweat, tears and effort, and the ramifications it has on the overall stability of the program is considerable.
  • There were some problems with Cg and GLSL shader selections which should now be taken care of.
  • ScummVM games can now be scanned in various ways (courtesy of RobLoach)
  • Downloading multiple updates at once could crash RetroArch – now fixed.
  • Several cores have gotten Retro Achievements support now. The official list of systems that support achievements now is: Mega Drive, Nintendo 64, Super Nintendo, Game Boy, Game Boy Advance, Game Boy Color, NES, PC Engine, Sega CD, Sega 32X, and Sega Master System.
  • You can now turn the supported extensions filter on or off from the file browser.

Effort to addressing user experience feedback

I think a couple of things should be addressed first and foremost. First, there is every intent to indeed make things like a WIMP (Windows Icons Mouse Pointers) interface around RetroArch. To this end, we are starting to make crossplatform UI widget toolkit code that will make it easy for us to target Qt/GTK/Win32 UI/Cocoa in one fell swoop.

We have also spent a lot of time plugging some of the rough edges around RetroArch and making the user interface more pleasurable to work with.

Youtube libretro channel

Hunterk/hizzlekizzle is going to be running the libretro Youtube channel from now on, and we’ll start putting up quick and direct Youtube videos there on how to be able to use RetroArch. It is our intent that this will do a couple of things:

1. Show people that RetroArch is easy to use and has numerous great features beneath the surface too.
2. It allows users to give constructive criticism and feedback on the UI operations they see and how they think they should be improved.
3. We hope to engage some seasoned C/C++ coders to help us get some of these UI elements done sooner rather than later. Most of RetroArch development mostly relies on a handful of guys – 5 at the most. It is a LOT of hard work for what amounts to a hobbyist project, and if we had a lot more developers seasoned in C/C++, stuff could be done quicker.
4. There is no intention at all to make RetroArch ‘obtuse’ for the sake of it, there is every intention to make it more accessible for people. Additional help would go a very long way towards that.

Regarding the current UIs and their direction, it is obviously meant to be a console-like UI experience. This might not be what desktop users are used to on their PCs but it is what we designed menu drivers like XMB to be. It is true that keyboard and mouse are mostly seen as afterthoughts in this UI but really, we wrote the UI with game consoles and something where a gamepad is the primary input device at all times, particularly since a keyboard to us is a poor way of playing these console-based games anyway.

Anyway, menu drivers like XMB and MaterialUI will never have any WIMP UI elements. HOWEVER, in upcoming versions, we will be able to flesh out the menubar and to allow for more basic WIMP UI elements.

RetroArch is meant to be a cutting-edge program that is ultra-powerful in terms of features. With that comes a bit of added complexity. However, we have every intent of making things easier, and with every release we put a lot of time and effort into improving things. But again, more developers would help out a substantial lot in speeding up certain parts that we are working on.

Our vision for the project involves an enormous workload and we’re considering differnt ways of generating additional support. If a Patreon might allow us to get more developers and get more stuff done faster, we might consider it. But we want such things to be carefully deliberated by both our internal development staff and the users at large. I hope you’ll be able to appreciate the relative rough edges around the program and appreciate the scope and the craft we have poured into the program. Please appreciate that we are pouring a lot of blood, sweat and tears into the program and that mostly we try to maintain an upper stiff chin when faced with all the criticism, but we do care and we do intend to do better. Volunteer coders are very welcome though, by people who have some time to spare and who want to make a difference. We ask for your understanding here, and we hope that by finally speaking out on this, users can gain a better understanding of our intent and be able to appreciate the program better in light of that.

Nintendo 64 Vulkan Low-Level emulator – paraLLel – pre-alpha release

$
0
0

Vigilante 8 running in ParaLLEl.
Here is a pre-alpha release of the hotly anticipated N64 Vulkan renderer, paraLLel. To coincide with this, a new RetroArch version has also been released that includes support for the async compute interface that this new renderer requires.

Also see our other major announcements today:

RetroArch 1.3.6 released

Lutro – easy retro game creation, powered by libretro

And our earlier story featured a couple days back on ParaLLEl –

First ever Vulkan Nintendo 64 emulator, ParaLLEl, coming soon, only for Libretro/

What is paraLLEl?

This is a standalone libretro core for now that we keep separate from the regular Mupen64plus libretro core that it is based on. It includes only a Vulkan rendering backend and a low-level RSP. This core will only work right now if you are running it with a Vulkan driver.

In the future, paraLLEl will be the new name for our N64 emulator which (while initially starting out as a Mupen64plus core) has grown into its very own entity. It will have among other things:

– Completely rewritten CPU cores, both interpreter and dynarec. We want to fix the remaining CPU bugs that prevents Mupen64plus from being able to run certain games that PJ64 can, for instance. We also want to be able to move away from having two separate dynarec systems in Mupen64plus, where one is aimed at Atoms and ARM CPUs, and the other is meant for desktop x86, and neither is particulary fast.
– A unified HLE video renderer that combines the best of Glide64, Gliden64, Rice, and GLN64, and offers optional runtime codepaths for performance.
– A unified LLE video renderer infrastructure that allows for both software rendering (Angrylion) and the Vulkan/GL 4.3 powered equivalent (the video plugin we now call paraLLEl).
– As part of the CPU rewrite, an RSP dynarec will also have been written around that time.

How to use this

  • Download RetroArch 1.3.6 (or any future version from this point on). See this blog post here.
  • Download the ParaLLel core. To do this, start up RetroArch. Inside the menu, go to Online Updater -> Core Updater. Scroll down in the list until you see Nintendo 64 (ParaLLEl).
  • Download it.
  • IMPORTANT! READ! Before starting, make sure that you have selected the Vulkan display driver. To check this, go to Settings -> Driver, and see if ‘Video’ says ‘vulkan’. If not, select it, and then restart RetroArch for the changes to take effect.
  • Load the core with a ROM.

Preliminary requirements

* A GPU capable of supporting the Vulkan API
* Vulkan drivers installed on your system

nVidia

ParaLLEl has been tested on an nVidia Maxwell GPU and has been confirmed to be running well.

AMD

ParaLLEl has been tested on an AMD Radeon 250 and has been confirmed to be running well.

Intel MESA iGPU

Easily the biggest problem right now out of all Big Three. Thankfully, Mesa developer Jason Ekstrand was very receptive to our feedback and together with him, we have been able to get Vulkan N64 successfully booting now on Ivy Bridge all the way up to Broadwell.

When we first started the renderer, it would crash at startup and not even let us ingame.

Apparently some of the patches that helped get paraLLEl up and running also helped The Talos Principle finally start to go-ingame, so that is nice to see!

If you want to test paraLLEl on an Intel iGPU on Linux, be sure to read on until the last paragraphs. You will have to compile a bleeding edge fork of Mesa, we will explain to you how to do this. Do note that in the future, all these patches will have been pushed to upstream, so if you are reading this blog post a month from now, just go with the latest upstream Mesa instead.

At a later date in time it is likely that your Linux distribution’s package management system will feature newer versions of Mesa with these patches already incorporated.

See some of the before/after screenshots here.

RDP emulation status

As this is a pre-alpha release, the full transplantation of Angrylion to compute shaders is not yet completely done, although many games already run reliably.

Hunterk made a couple of videos of RetroArch running ParaLLEl using RetroArch’s built-in recording feature.

Super Mario 64

The quintessential N64 game. Not too many surprises here.

Note – you might have to enable ‘Synchronous Sync’ on Intel Ivy Bridge in order to be able to progress beyond the title screen. This might not be an issue on other hardware.

Mario Kart 64

The popular karting game. Note the framebuffer readback activity on the wall.

Legend of Zelda: Majora’s Mask

The follow-up to the Legend of Zelda: Ocarina of Time.

Note – for both Majora’s Mask and Ocarina of Time, it is required to enable ‘Synchronous Sync’ so that the subscreen works correctly.

Body Harvest

In some ways the spiritual precursor to GTA3, made even by the same company. Note a couple of things: unlike with any RDP HLE plugin ever, not only can we cross the bridge, but we can do so without the player literally walking through the bridge instead of walking correctly on top of it. High-level RSP up until now has been too buggy to accurately enable both Body Harvest US and European versions from working with the crossbridge (a patch by LegendofDragoon made it work for the European version, but with any HLE plugin you would still see the player character essentially walking through the bridge when passing over it, and in the US version you just plain cannot cross the bridge unless you are using a low-level RSP plugin.

So, low-level RDP in conjunction with low-level RSP takes care of all that.

Jet Force Gemini

One of the later games released by Rare before the big Nintendo-Rare breakup. Shares some microcode with Diddy Kong Racing and Mickey’s Speedway USA, so all three games pretty much work without any major issues on paraLLEl.

There are some things to talk about here. There is one core option in paraLLEl in specific which has a heavy bearing on emulation accuracy:

* Synchronous RDP *

Turning this off allows for higher CPU/GPU parallelism. However, we found so far that many games either won’t run or have broken framebuffer effects if left disabled, so we felt it was safer to leave it enabled for now.

It has been verified that with certain games, disabling this can provide for at least a +10fps speedup. Try experimenting with it.

Things you need to know before running the alpha

Killer Instinct Gold running in ParaLLEl. This background would normally be glitched in any other HLE plugin.

Like they say, Rome wasn’t built in a day. This is an alpha release. Keep in mind that not every game right now will run correctly but that it’s expected we will be able to nail all these issues in quick succession shortly.

* Even though this renderer delivers on its promises and completely eliminates the RDP rendering bottleneck, the RSP bottleneck still remains. In order to make emulation significantly faster, we will therefore have to start moving away from having only an LLE interpreter RSP core, and move towards a dynamic recompiler. Work on this is commencing, so this bottleneck is just temporary. For now, the beefier your CPU is, the less chances you have of running into said bottlenecks.
* Not all games will work correctly right now. Porting the Angrylion renderer to Vulkan has been a challenge to say the least. There are still some unimplemented edge cases which will be fleshed out in the upcoming weeks.

Major bugs remaining/things left to be done

Bangai-o running in ParaLLel.
Some of the current issues that still makes this a pre-alpha candidate

  • VI overlay.
  • Some framebuffer management corner cases
  • Some obscure combiner features
  • Interlacing bugs – games that output to the screen in interlaced mode will show some graphics glitches right now. Should be one of the more trivial things to fix.

What’s different between this and Angrylion RDP AIO/CEN64?

Angrylion RDP AIO and CEN64 are using the software-rendered Angrylion plugin (the base for most RDP-based renderers) and optimizing it with SSE code and multithreading. ParaLLEl instead is porting Angrylion to the GPU (through Vulkan) with compute shaders and leveraging async compute to be able to parallelize it as best as possible. CEN64 is also going for an RSP dynarec to speed up things further.

The next step for ParaLLEl will also be an RSP dynarec to increase performance, and in fact MarathonMan (the author of CEN64) has been willing to help us out with some performance ideas in this department.

Both approaches (optimizing the software-rendered Angrylion plugin) and hardware acceleration (ParaLLEl) are valid and worthwhile.

Android port

Honestly, for this release I have not yet bothered compiling it for Android and seeing if it will run on the Shield tablet. I will start doing that after this release is over. I think it will become more useful once RSP dynarec is in but it might already be neat to be able to run it regardless.

Source

Legend of Zelda: Ocarina of Time running in ParaLLEl.

The sourcecode for ParaLLEl can be seen here. In order to compile it yourself right now, you need to git clone the mupen64plus libretro repository, and run the following command:

make HAVE_VULKAN=1

Compiling bleeding-edge Mesa for Intel Vulkan (Linux) in order to use paraLLEl

There are not a lot of Vulkan test cases out right now, so paraLLEl needed some special patches pushed to Mesa in order for it to work.

Here are the steps required:

1. Type these lines into the commandline:

git clone git://people.freedesktop.org/~jekstrand/mesa

Go to the directory by typing:

cd mesa

git checkout wip/retroarch

autoreconf -vfi

./configure --with-vulkan-drivers=intel --with-gallium-drivers= --with-egl-platforms=wayland,x11 --with-dri-drivers=i965

(Verify that in the output, Vulkan drivers does not say ‘no’).

make

2. After we have done all this, we will need to setup a file to point to our vulkan driver. If it does not exist, create it here:

/etc/vulkan/icd.d/dev_icd.json

This file should point to the compiled Vulkan driver library file’s path. This is the file you just created before.

Here is a local example of how it could look like. You will have to change the filename path to wherever your libvulkan_intel.so file is located.

Here is an example of how it could look:

{
"file_format_version": "1.0.0",
"ICD": {
"library_path": "/home/squarepusher/libretro-super/mesa/lib/libvulkan_intel.so",
"abi_versions": "1.0.3"
}
}

You should replace the library path with the exact filename location on your system. Save this file (you might need root permissions for this).

What’s next?

Expect major speedups soon and other exciting news regarding dynarec unification plans. Daeken will be guest blogging about that soon, and it will have far ranging ramifications for libretro cores and emulators in general. Also, expect Beetle PSX to be one of the other major beneficaries of that.


RetroArch 1.3.6+ beta release for PS Vita HENkaku!

$
0
0
RetroArch appearing on the PS Vita Live Area homepage.  Screenshot was taken on a PS TV.
RetroArch appearing on the PS Vita Live Area homepage. Screenshot was taken on a PS TV.

Today we are releasing a beta version of RetroArch 1.3.6+ (latest snapshot, release candidate for 1.3.7) for the Playstation3 and PS Vita. Be sure to thank frangarcj for the latter since he went through the trouble of making sure we could make the jump from Rejuvenate to HENKaku in swift order.

Where to get it

You can get the PS Vita/PS TV version here:

http://buildbot.libretro.com/nightly/playstation/vita/

Grab the latest archive.

How to install


1. Extract the contents of this 7zip archive to a folder somewhere on your PC. This will extract a bunch of vpk files to your harddrive.
2. On the PS Vita/PS TV, make sure the HENkaku exploit has already been installed. Go to the bubble ‘molecularShell’ and start it. Once inside the filebrowser, press ‘Select’ to start the FTP server. Write down the FTP server address you see here.
3. Go back to your desktop PC, start up an FTP client, and input the IP address and port that was displayed on your PS Vita/PS TV. Transfer the vpk files to some place on either ur0: (internal storage) or ux0: (this being your Memory Card).
4. On the PS Vita/PS TV, press circle to go back. Then once back inside the filebrowser, go to the directory where you extracted the vpk files. Install the cores you want.
5. Exit the ‘molecularShell’ program. You should now be back inside the home screen. From here,
RetroArch bubbles should start appearing in the menu. You can now use RetroArch.

How to install ROMs

1. The same way you installed RetroArch. Start ‘molecularShell’, go through the previous section’s steps 2 and 3 again, but this time transfer roms over instead. Then load them from RetroArch.

NXEngine/Cave Story running on RetroArch Vita.

State of the port

What works

* (Core-related) CatSFC / SNES. Works fine. Should run at fullspeed for most games (dip to 42fps on Yoshi’s Island intro screen (SuperFX2 game), seems to be fullspeed otherwise).
* (Core-related) FB Alpha CPS1. Works fine. Fullspeed. Runs all games. Use an older FBA romset.
* (Core-related) FB Alpha CPS2. Works fine. Fullspeed. Runs all the big CPS2 ROMs. Use an older FBA romset.
* (Core-related) FB Alpha Neo Geo. Works fine. Fullspeed. Not all big ROMs will work right now though. KOF 96 could be loaded (about 23/24MB). Might have to play around with heap to be able to get bigger ROMs to load. For now expect same size limitations as the Wii port. Hopefully we can get past this soon.
* (Core-related) FCEUmm. Works fine. Fullspeed.
* (Core-related) Genesis Plus GX. Works fine. Fullspeed.
* (Core-related) Mednafen Neo Geo Pocket Color. Works fine. Framerate at around 52/53fps. There might be a new Neo Geo Pocket Color core coming soon (not Mednafen NGP) which would run at fullspeed with no problems.
* (Core-related) Handy / Lynx. Works fine. Fullspeed.
* (Core-related) Mednafen Wonderswan. Works fine. Fullspeed.
* (Core-related) Mednafen Virtual Boy. Works. Too slow (around 26fps). Corrupted pitch (likely due to 32bit color). Speedups/idle loop optimization hacks MIGHT bring this fullspeed later on.
* (Core-related) NXEngine / Cave Story. Works fine. Fullspeed.

What doesn’t work

* ROMS have to be currently unzipped now (EXCEPT for the FB Alpha ROMs).
* No core switching yet from inside RetroArch. For now, each core is a standalone program.
* Add Content -> Download Content currently doesn’t work. If you do try it, you might have to restart.
* History list doesn’t work yet.
* Save states can be saved, but cannot be loaded yet. We need to figure out why.
* Threading needs to be still implemented.
* (Core-related) 2048 core. ‘Start content’ does not work yet like it should. Wait until we fix this.
* (core-related) Prboom/Doom core. Crashes after loading a Doom WAD. Wait until we fix this.
* (Core-related) Picodrive core. Crashes after loading a ROM. Wait until we fix this.
* (Core-related) QuickNES core. Doesn’t load a ROM. Wait until we fix this.
* (Core-related) Gambatte core. Doesn’t load a ROM. Wait until we fix this.
* (Core-related) SNES9x Next core. Doesn’t load a ROM. Wait until we fix this. Will likely be too slow compared to CatSFC anyway, so not sure if worth it for Vita.
* (Core-related) DOSBox core. Haven’t tried this yet. Likely too slow to be worthwhile.

Future plans

* More cores, fix remaining cores that are broken.
* Try to get Cg runtime working so we can have Cg shaders running.
* Try to get multiple gamepads working on PS TV.
* More.

A sneak peek at 1.3.7 features

Since this is a current nightly snapshot release, PS3 and Vita users are able to get a sneak peek at some of the features that will be part of RetroArch 1.3.7 for the other platforms.

  • Improved error handling. When loading the wrong ROM into a core, most cores should be able to now gracefully exit instead of just quitting or crashing RetroArch.
  • Much more complete info message system. Press ‘Select’ on any entry and 99% of the time it should show you a handy help message explaining to you what each setting does. The ‘English’ language setting is currently the one that is most complete, for all other languages we need to wait until translators have finished adding all the help messages in their own language.

RetroArch 1.3.6+ beta release for PlayStation3!

$
0
0


The PlayStation 3 port is back after it was decommissioned for a long time. Consider this a beta version in anticipation of the upcoming 1.3.7 version which will be further fleshed out.

Also check out our concurrent release for the PS Vita:

RetroArch 1.3.6+ beta released for PS Vita (HENkaku-ready)!

Thanks to PSGL, the PlayStation3 driver can use the XMB menu driver using the OpenGL rendering backend. The simplified ribbon should be running properly in the background too.

Where to get it

Ezi0 graciously provided these two binaries for us.

CEX version: download here.

DEX version: download here.

What doesn’t work yet

This version can be considered a beta release. Here are the current issues:

  • You cannot scan for content as of right now. Instead, for now you should just load content directly from the filesystem.
  • To be able to use zipped ROMs on emulators like SNES9x and other similar emulators, always use ‘Open Archive As Folder’, then select the ROM you want to use. Don’t use ‘Load Archive With Core’ which won’t work for now.
  • If you go to ‘Information’ -> ‘Core Information’, it currently doesn’t show anything. Not a big deal for now but something we will want to fix later on regardless.
  • None of the ‘downloading’ features right now will work in the PS3 port. Our networking stack code for PS3 apparently requires some customizations still. If there are any PS3 devs who can help with this, by all means.

The PS3 version now uses the XMB menu driver, a big step-up from the previous versions’ RGUI menu driver. The font driver we are currently using for PS3 is the default bitmap font, so it doesn’t look as good as it could be, but we are going to be moving over to more fancy font rendering shortly, possibly using stb_font or something similar.

A sneak peek at 1.3.7 features

Since this is a current nightly snapshot release, PS3 and Vita users are able to get a sneak peek at some of the features that will be part of RetroArch 1.3.7 for the other platforms.

  • Improved error handling. When loading the wrong ROM into a core, most cores should be able to now gracefully exit instead of just quitting or crashing RetroArch.
  • Much more complete info message system. Press ‘Select’ on any entry and 99% of the time it should show you a handy help message explaining to you what each setting does. The ‘English’ language setting is currently the one that is most complete, for all other languages we need to wait until translators have finished adding all the help messages in their own language.

paraLLEl RDP and RSP updates (September 2016)

$
0
0

Unfortunately, I haven’t had much time to work on paraLLEl lately, but there is plenty to update about.

paraLLEl RSP – Clang/LLVM RSP recompiler experiment

Looking at CPU profiles, paraLLEl RDP could never really shine, as it was being held back by the CXD4 RSP interpreter, so groundbreaking speedups could not be achieved. With paraLLEl RDP, the RSP was consuming well over 50% CPU time. This was known from the beginning before RDP work even started. After the first RDP pre-alpha release, focus shifted to RSP performance, and that’s what I’ve spent most time on. None of my machines are super-clocked modern i7s, which have been required to run N64 LLE at good speed.

Micro-optimizing the interpreter is a waste of time, I needed a dynarec. However, I have never written a dynarec or JITer for that matter before, and I was not going to spend months (years?) learning how to JIT code well for ~4 architectures (x86, x64, ARMv7, ARMv8). Instead, using libclang/libllvm as my codegen proved to be an interesting hack that worked surprisingly well in practice for this project.

The RSP has some characteristics which made it easier to design a JITer for than any normal CPU:

  • Separate instruction and data memory (4K each)
  • Only way to modify instruction memory is through explicit DMA instructions
  • Main CPU can poke into IMEM over MMIO, but it’s trivial to check for changes in IMEM on RSP entry
  • Fixed instruction length (MIPS)
  • No exceptions, IRQ handling, MMU or any annoying stuff
  • No complex state handling, just complex arithmetic in the vector co-processor

However, the RSP has one complicating issue, and that is micro-code. RSP IMEM will change rapidly as micro-code for graphics, UI, audio is shuffled in and out of the core, so the dynarec must deal with constantly changing IMEM.

Reusing CEN64/CXD4 RSP

The goal was to make it fast, not writing everything from scratch, so reusing CEN64’s excellent vector unit implementation made implementing COP2 a breeze. Various glue code like COP0/LWC/SWC was pulled from CXD4 as it was easier to reuse considering it was already in Mupen. Several bugs were found and fixed in CXD4’s COP2 implementation while trying to match the interpreter and dynarec implementations, which is always a plus.

Basic codegen approach

When we want to start executing at a given PC, we see if the code following that PC has been seen before. If not, generate equivalent C code, compile it to LLVM IR with libclang, then use LLVM MCJIT to generate optimized executable code. To avoid having to recompile long implementations of vector instructions all the time, external functions can be used in the C code, and LLVM can be given a symbol table which resolves all symbols on-the-fly.

Obviously the JIT time is far longer than a hand-written JITer would be, so reducing recompiles to the bare minimum is critical. RSP IMEM is small enough that we could cache all generated C code and its generated code on disk if this become annoying enough.

Debuggable JIT output

Compile the binary with -rdynamic and instead of going through libclang/llvm, dump C code to disk, compile through system() and load as a dynamic library, and step through in GDB. The -rdynamic is important so that the .so can link automatically to COP0/COP2 calls.

Difficult control flow? Longjump!

While we need performance, we don’t need to go to extremes. Whenever the code-gen hits a particularly complicated case to handle, we can cop-out by longjumping up our stack and re-entry from where our PC would be. A good case of this is the MIPS branch delay slot, which is one of the single most annoying features to implement in a MIPS dynarec. The common is easy to implement, but branching in a branch delay slot? Classic ouch scenario. Last instruction in a block sets up branch delay slot and first instruction in next block needs to resolve it? Ouch. That first instruction can also set up a branch delay slot, and so it goes …

If IMEM has been invalidated due to DMA, we can similarly longjump out and re-check IMEM, similar for the BREAK instruction.

Return stack prediction

JAL and JALR calls assume that their linked address will be returned to in a stack like fashion. On JAL/JALR, block entry is called recursively in the hope we can return back to it. To potentially avoid having to deal with indirect jump [jr $r31], jr will check the return stack and simply return if it matches an earlier JAL/JALR.

Async JIT compiles?

To reduce stalls, we could kick JIT compiles off to a thread and interpret as a fallback.

Failed attempt #1 – Hashing entire IMEM and recompile it

This failed badly as even though micro-code is very static, IMEM will contain garbage data that is never executed. No compiled block was ever reused.

Failed attempt #2 – Hashing fixed block size from PC

The JIT lookahead was set to 64 instructions (tiny for a regular dynarec, but IMEM is already tiny …). This doesn’t really help. Blocks close to garbage regions would trigger 2-3 recompiles every frame, which killed performance.

Successful attempt #3? – Analyzing logical end of block before hash

The idea of #2 was okay, but the real fix was to pre-analyze the block and find where the block would logically have to end, then hash and compile the estimated range. I haven’t tested every game obviously, but it seems very promising. No recompiles have happened after a block is first seen.

The obvious difficult RSP LLE games seem to work just fine along with the Angrylion software renderer. With Angrylion and paraLLEl RSP, the RDP eats up 70% of the profile, and RSP is barely anywhere to be seen, ~0.5% here and there from the expected heavy-hitters like VMADN, hashing and validating IMEM and so on.

Performance

Lots of games which used to dip down to ~35/40 FPS now ran at full-speed with paraLLEl RDP async/RSP combo, which was very pleasing.

Future

LLVM RSP is really a proof-of-concept. Codegen should ideally be moved to a leaner JIT system, Tarogen by Daeken seems like a good way forward.

RDP bug-fixing

After I was happy with the RSP, it was time to squash low-hanging rendering bugs.

Paper Mario Glitches

The copy pipe in RDP works in strides of 64-bit, and the rasterizer rasterizes at this granularity. Lots of sprite based games seem to use this behavior.

Copy pipe glitches

The fix was to mask the X coordinate in varying stage so that rasterization tests would happen on 64-bit boundaries, as if RDP rasterization isn’t painful enough as is …

Pilotwings shadows

Pilotwings broken shadows

Why did a classic HLE bug show up here? Well, this is caused by a clever hack in Pilotwings where the shadows are masked out by framebuffer aliasing!

First, the color buffer pointer and depth buffer pointers are assigned to the same location in memory. Depth test is turned on, but depth update is off … But, color writes to depth, so this is a problem. 5/5/5/3 16-bit color data now needs to alias per-pixel with a 3.11/4 depth buffer, and the fix was to implement a special path for the aliasing scenario where depth would be decoded after every color write. Pilotwings did stencil shadows without stencil, clever.

Fortunately, since it’s implemented with compute, this was trivial to implement once the problem was understood.

Interestingly enough, the UI bug in Pilotwings was also solved by this.

“Fixing” async mode

ParaLLEl framebuffer handling code is fairly incomplete (it’s really hard x___x), and async mode was causing several lockups, even in games which did not use the framebuffer for effects. The problem was that async framebuffer readbacks came in too late, and the game had already decided to reuse the existing memory for non-graphics data. Overwriting that data broke everything obviously.

The temporary fix is to maintain a shadow RDRAM buffer in async mode, separate from the regular RDRAM. At least stuff doesn’t crash anymore. The proper fix will be a unified model between full sync and async modes, but this is arguably the hardest part of writing any GPU accelerated plugin for these whacky graphics chips.

Async mode is how to unlock large performance gains. Can’t complain about 120+ FPS on Mario 64 on my toaster rig, used to be ~30 FPS with Angrylion/CXD4.

Corrupt textures in GoldenEye (and possibly other Rare games)

There have been many bugs in the palette part of TMEM emulation, and as expected, this was also a case of this. GoldenEye used TL parameter in load_tlut to do weird offsets from the base texture pointer. This was unimplemented before, so stepping through Angrylion line by line helped figure out how this offset should be implemented.

Weird looking wall textures in Turok

Wrong
Correct

The problem here was RDP’s interesting “detail LOD” feature. This, along with LOD sharpen was unimplemented, and implementing that fixed the issue.

Mario Tennis / Mario Golf weird UI blending bugs

Mario Tennis/Golf are really hard games to emulate and it’s still pretty broken, but some UI bugs were bugging me.

Blending in RDP is very complex and a minefield for rendering bugs, of course there had to be yet another way to do alpha tested sprites.

Instead of alpha blending, or alpha testing directly like any sensible game would do, Camelot decided to use alpha-to-coverage, then color on coverage as a mux for the … blending mux? Coverage overflow would happen when alpha was non-zero, basically a bizarre way to do alpha testing. Funny enough, this was implemented correctly already, but a cute little underflow in coverage update was actually causing the bug. The blender passed its tests all the way to coverage update with a coverage of 0, who would have thought that was possible! That path could only trigger on the very specific render state bits that was set. One liner fix and two whacky UI bugs were gone.

How to debug this

To drill down issues, first, I dump RDP traces from either paraLLEl RDP or Angrylion. The trace records all RDP commands and updates to RDRAM.

In the offline tool, I can replay the trace and dump all frames. Once I’ve zoomed in on the interesting frame, I trace that frame, primitive by primitive. The end result is a series of images for that frame. I can then replay the frame, and break on the exact primitive I want to debug.

Conclusion

This concludes the first paraLLEl update. Still lots of issues to sort out, framebuffer management and full VI emulation the biggest targets to shoot for.

RetroArch Web Player

$
0
0

An Emscripten port of RetroArch has existed for years, but until recently, we never had a good opportunity to launch it in a state we felt comfortable with. Well, until now that is.

Web Player

So what is RetroArch Web Player? It’s a port of RetroArch that runs inside your web browser, powered by emscripten and asm.js. Most modern browsers available today should be compatible. That being said, we strongly recommend you use Google Chrome right now for smooth v-synced gameplay with no audio crackling.

You can check it out right here!

Your browser does not support iframes.

Dropbox support may not work in this embedded-player we added to this post, we haven’t enabled SSL on our main site and Dropbox doesn’t allow any sort of wildcard or regex on web apps.

You can also click on ‘Web Player’ in the top-right corner of the libretro.com website and in our itch.io page in order to use it.

Current state of the port

  • Over 40+ libretro cores available
  • Gamepad support via SDL2
  • Hybrid filesystem including cloud syncing courtesy of BrowserFS. This filesystem stores userdata in one of two backends (browser application storage or Dropbox); assets are loaded synchronously from an online repository and cached by the browser for future usage

Known frontend issues

  • Player 1 gamepads can sometimes control both player 1 and 2 at the same time in games that support 2 players.
  • Guide button mapping is currently not available. We’re not sure if this is a limitation of the SDL2 input driver.
  • Recent History doesn’t work yet.
  • GLSL shaders don’t work (yet?).

Known core issues

  • BlueMSX (MSX) currently doesn’t work.
  • Craft core (Minecraft) currently hangs.
  • Desmume core (Nintendo DS) currently doesn’t work.
  • EasyRPG core (RPG Maker game engine) currently doesn’t work.
  • FFmpeg core (Movie/music player) currently doesn’t work.
  • Mupen64plus core (Nintendo 64) currently doesn’t work.
  • PicoDrive core (Sega Genesis/32X) currently doesn’t work.
  • QuickNES core (Nintendo NES) has slightly distorted graphics.
  • Tyrquake core (Quake 1 engine) currently hangs at startup loading screen.

Special thanks

  • Jvilk — for his excellent BrowserFS implementation and fixing a few bugs for us immediately when they were reported
  • RobLoach — for his work on the template
  • Twinaphex — for his tireless work on RetroArch and the cores
  • ToadKing — for the initial emscripten port and some fixes he sent on our way recently
  • Radius — for something? idk I did some work I think

Mednafen/Beetle PSX – PGXP arrives!

$
0
0

Mednafen/Beetle PSX has made another significant stride forward! iCatButler has contributed a working backport of PGXP for Mednafen/Beetle PSX.

PlayStation rasterization issues

Several issues can be noticed in most PlayStation games’ graphics.

Wobbly polygons (lack of subpixel precision)


This can often be noticed on character models. In addition to the models looking very glitchy/wobbly, you can also often notice that their face textures look deformed. If you apply very granular movement to the character, you can often notice a character model’s head deforming based on its distance from the camera. For examples of this, try to find a scene in Final Fantasy VIII/Resident Evil 1 where the characters are very close to the camera. With no subpixel precision, you would see a continuously changing and deformed face texture on the main characters.

Dancing/warping textures (lack of perspective correct texturing)


In many games, you will see the texture maps on the ground dancing/warping as you move around the environment. See the video above for an example of what we are talking about.

In addition to this, other games (like Ridge Racer Revolution, or Tomb Raider 2) can also sometimes show random color outlines around texture maps while the camera is moving.

All of the aforementioned issues can be traced back to the lack of perspective correct texturing.

This, combined with the lack of subpixel precision, can result in a very glitchy look in many a PlayStation game. Most PlayStation-to-PC ports didn’t put the extra effort in to fix these issues either. For instance, the aforementioned issues were fixed in Resident Evil 1 PC but then by the time we get to Resident Evil 3: Nemesis for PC, we can spot wobbling polygons again on the character models. A similar thing happened with the Final Fantasy series. The issues were fixed for Final Fantasy VII but Final Fantasy VIII’s PC port featured the same subpixel precision issues as the PSX version. Lack of time/effort and optimizing specifically around the PSX’s limitations are probably a reason for developers taking shortcuts even on far more capable hardware.

Geometry Transfer engine and integer precision math

The PlayStation’s MIPS R3000A processor was a very barebones MIPS CPU, very outdated even by 1994 standards. What made it special at the time was the coprocessor attached to it which made it very adequate at 3D rendering: the Geometry Transfer Engine. It’s a coprocessor (attached to COP2) which has fixed-function functionality allowing the programmer to do perspective transforms, rotations, light sourcing, depth cuing, etc. Being able to do this at nearly zero cost was the envy of many a PC around that time period. Without this coprocessor, the paltry 33MHz main CPU would have been unable to render most of the graphics at full speed performance.

The PSX had no floating point unit installed as COP1 (coprocessor 1), and neither did the GTE have any float support. It deals mainly in fixed point math, and because of the rotate and translation transformations involved that occur on the GTE side, precision errors will build up and this will result in the ‘wobbling’ effect you can see manifested onscreen. At the very end when the GTE has done its processing, it will output the results of the perspective transform to the GPU as integer pixel coordinates. The GPU then has to draw the scene. Polygons will snap into place until one of the vertices moves enough to snap into a different pixel.

The N64 had a similar configuration to the PSX, except that the equivalent to GTE was called RSP there – also installed as COP2 (coprocessor 2). Unlike the PSX, though, the N64 also had an FPU installed as COP1 (coprocessor 1). Like the GTE, RSP deals mainly with integer fixed-point math, but unlike the GTE, custom microcode can be uploaded to the RSP, making it more flexible and capable of performing custom tasks programmed by the game developer specifically for the game. In certain games you can see similar wobbling issues (F-Zero X’ vehicles is a good example), but it’s far less severe.

Furthermore, what made the difference in terms of the N64 having more stable rendering compared to the PSX is the lack of perspective correct texturing, which the N64 does have. Calculating the coordinates so that a texture would look correct from any angle would be computationally expensive, costing maybe 2 divisions per sample. By only applying perspective-correct sample coordinates at certain intervals, rendering could be done much quicker on the PSX, but at the cost of the ‘warping/dancing’ polygons that you can see in so many PSX games. To combat these issues, you’d see developers like Psygnosis using many tricks in games like Wipeout to ‘mask’ these issues (for instance by subdividing textures into many parts).

The solution: PGXP

PGXP attempts to kill two birds with one stone. First, it introduces subpixel precision to get rid of the wobbling polygon issues. Second, it adds perspective correct texturing to stop the ‘textue warping/dancing’ issues.

iCatButler first started integrating PGXP into the emulator PCSX-R (by injecting it into Pete’s OGL2 plugin, a closed-source plugin). It seems this attempt has been successful and was the first one out of the starting gates, but there are some geometry issues which seems partly can be attributed to the ageing fixed-function Pete’s OGL2 renderer.

iCatButler now has backported this functionality to Mednafen/Beetle PSX’s GL renderer. According to iCatButler, there are less geometry issues with Mednafen/Beetle PSX’s GL renderer. See this screenshot for instance –

A comparison between PGXP with PCSXR vs. Mednafen/Beetle PSX

Example video

This video shows a before/after example of PGXP + perspective correct texturing with the game Tomb Raider.

Other examples

Without PGXP. Notice the black outline around one of the texture maps and the warped/distorted textures. With PGXP enabled and perspective correct texturing. The black outline is gone now and the repeating textures are correctly aligned now.
With PGXP enabled. The facial distortions appear to be gone now. Without PGXP. Notice the distorted faces.
Without PGXP. Notice the inconsistent line patterns on the ground and the warped textures. With PGXP enabled. Notice how the lines are straight now on the ground among other things.

How to use it?

You need to use the latest version of Mednafen/Beetle PSX HW. In case you don’t already have it or you are not on the latest version, you can get it from RetroArch’s Online Updater.

You need to be using the OpenGL renderer in order to use PGXP. To make sure of this, go to Quick Menu -> Options and make sure it says ‘opengl’ at ‘Renderer (restart)’.

To enable PGXP, you set ‘PGXP operation mode’ to a value other than ‘OFF’.

‘memory’ – the default enabled mode. This is a less CPU-intensive version of PGXP, and it also tends to be less buggy than the other one. Try this by default unless you want to experiment.
‘memory + CPU’ – the secondary enabled mode. This is more CPU intensive and can result in geometry glitches. However, it has been demonstrated that it can help reduce wobblyness in polygons even more for certain games (such as Resident Evil 3: Nemesis).

There are two other PGXP options which you might want to experiment with:

‘PGXP vertex cache’ – maintains a cache for all the vertices. This might result in better performance but we recommend you leave it off for the majority of games since it can result in graphics glitches.

‘PGXP perspective correct texturing’ – This enables or disables ‘perspective correct textures’. For most games you definitely want this enabled, otherwise enabling PGXP will only get you subpixel precision.

Performance tricks

The GL renderer is still in a very inoptimal state overall. In order to increase performance, you can turn V-Sync off. To do this, go to Settings -> Video and turn off V-Sync.

Other things that can help is reducing the internal resolution and/or setting Texture filtering to ‘nearest’. ‘3point N64’ and ‘bilinear’ can result in more visual glitches and definitely has a negative impact on performance.

What’s next for Mednafen/Beetle PSX?

The GL renderer is definitely not as optimal as it could be, and we are trying to find solutions for making it much faster. Stay tuned!

Viewing all 293 articles
Browse latest View live